 Join Slack
Using V-Net (isolated virtual network) services in phoenixNAP BMC
V-Net, under Services –> V-Net, is an isolated virtual network service. Netris loads your bare metal server metadata from phoenixNAP BMC into the Netris database. So when you create a V-Net service (a virtual network), you list the bare-metal servers you need to get on that virtual network.
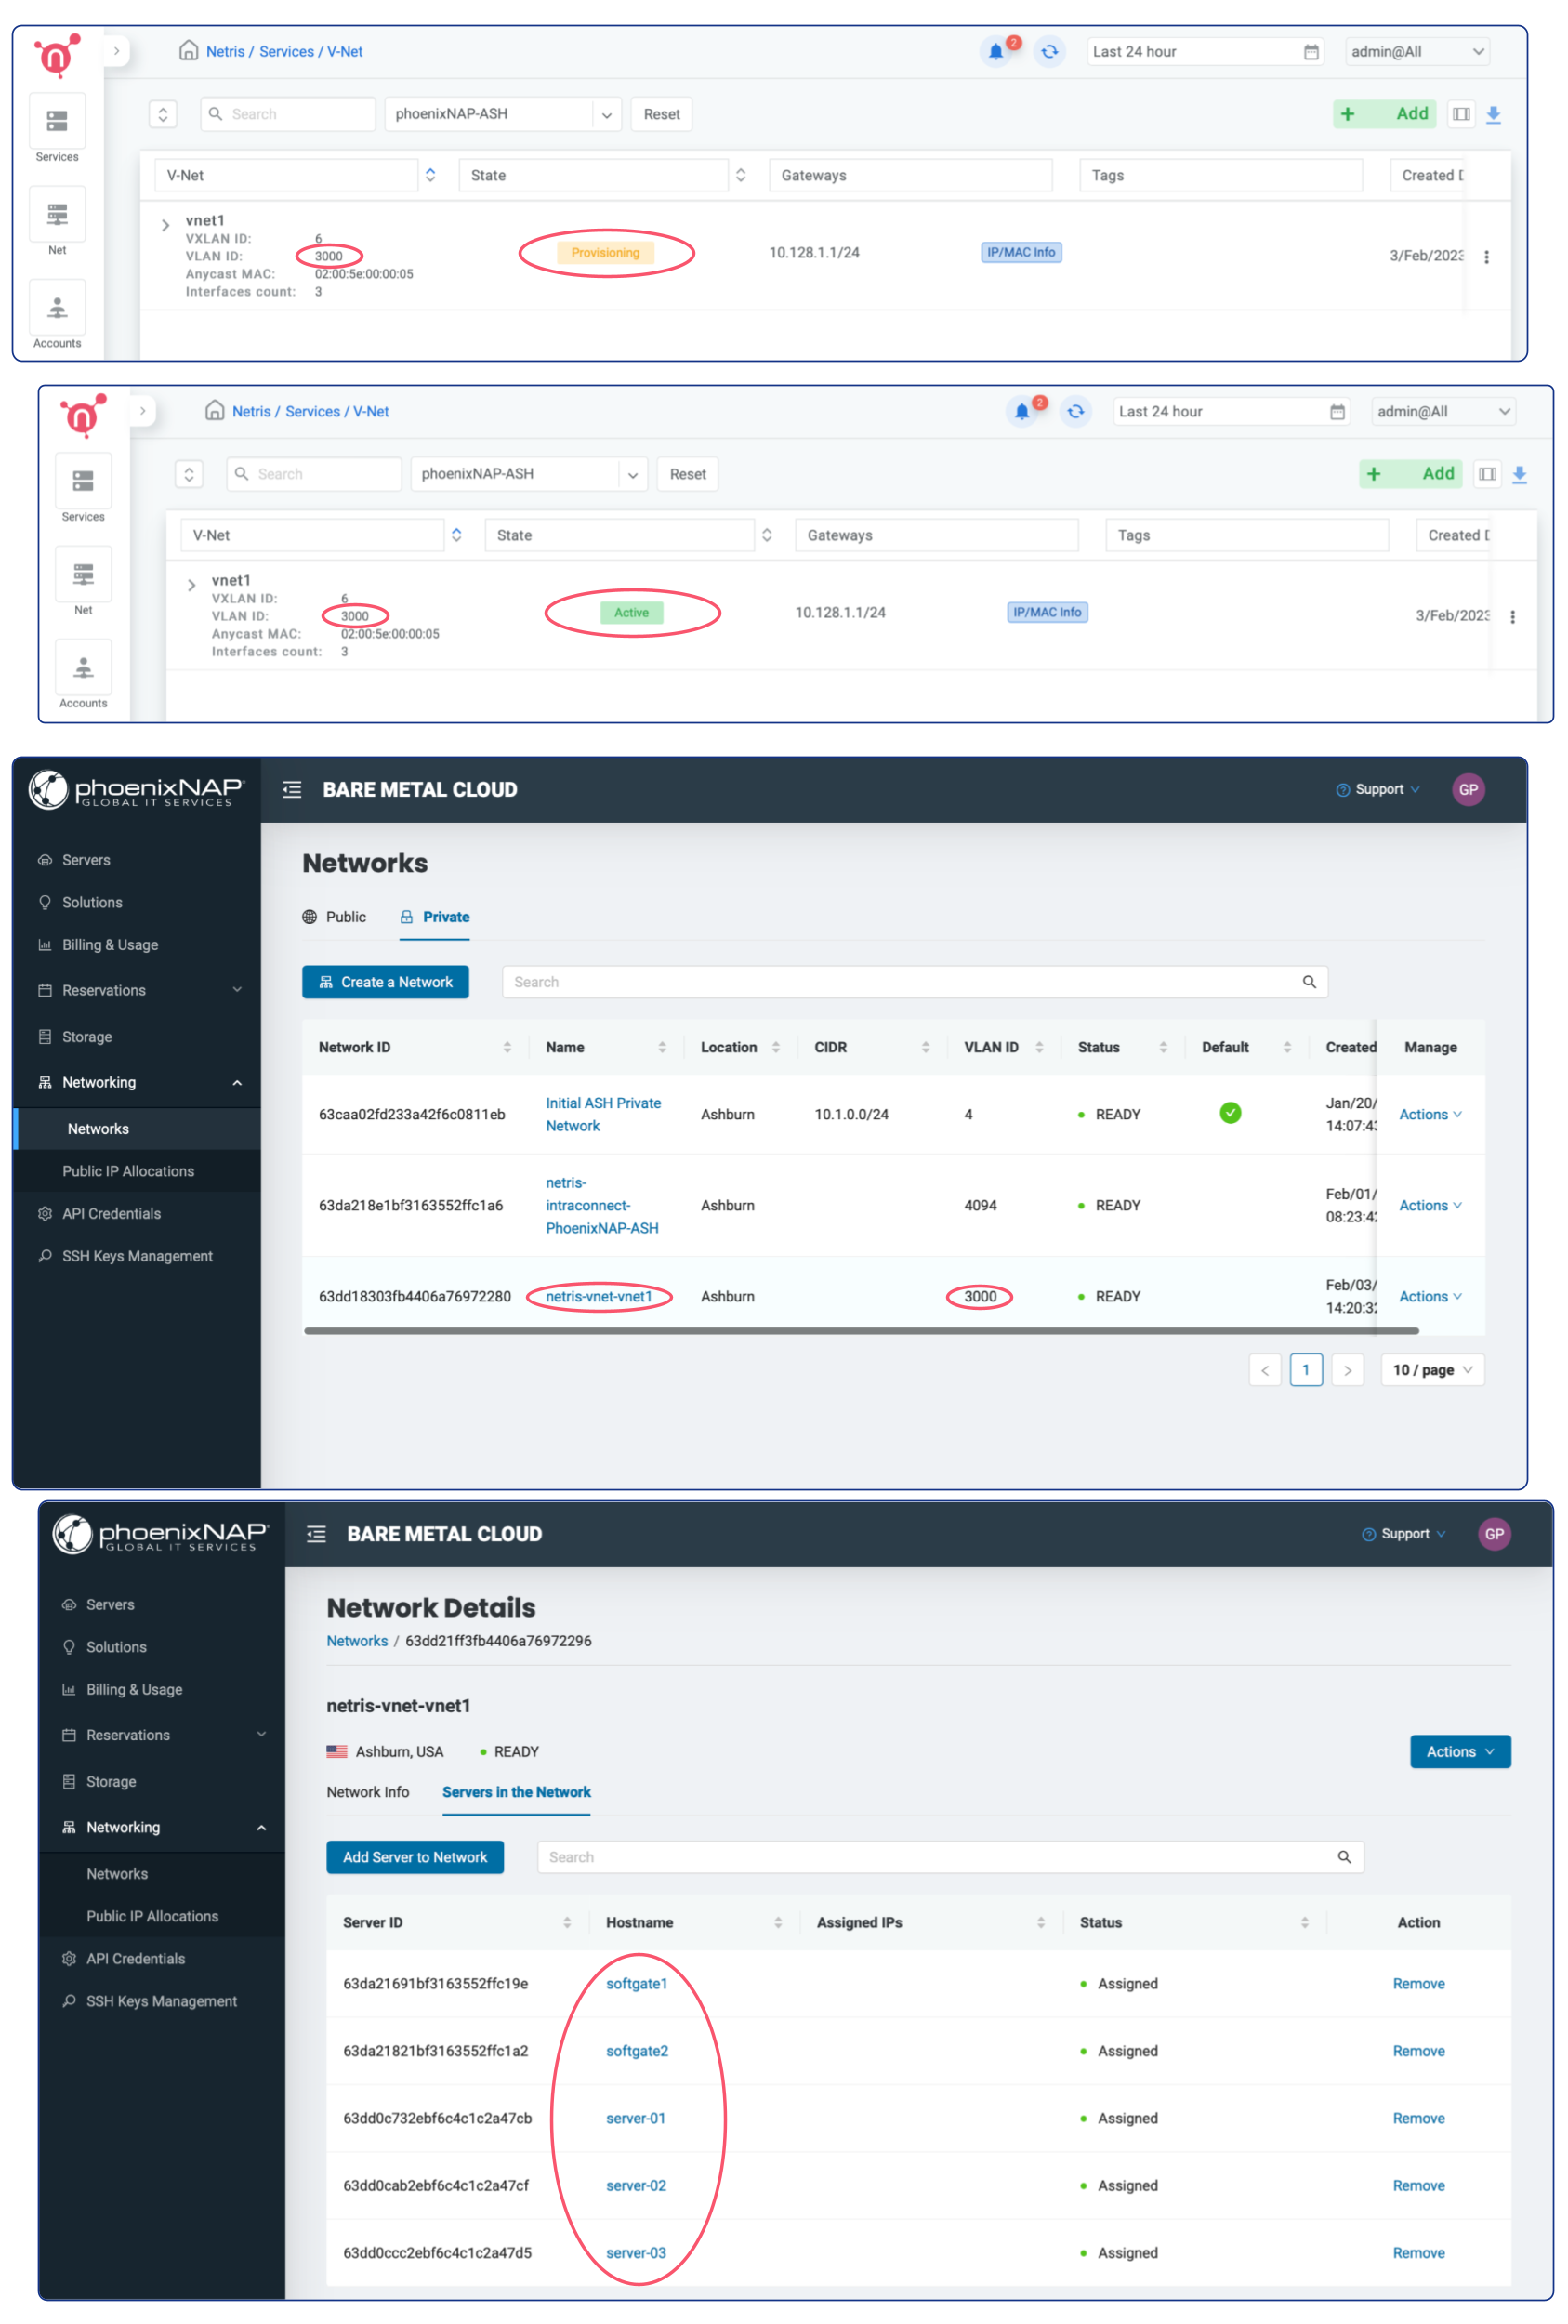
Netris V-Net (in phoenixNAP BMC scenario) has a global VLAN ID. Per every V-Net, Netris will provision a Private Network using phoenixNAP BMC API. Then Netris will include the listed bare metal servers + SoftGate nodes into that newly created Private Network. SoftGate nodes are the default gateway for the V-Net services.
Adding Subnets for V-Net
Before starting to use the V-NETs, you need to create a few subnets of private IP address blocks to be used by you and your colleagues later on for creating V-Nets. For now you can set the Tenant field to Admin, but in the future if you need to create a separate user role that should be able to consume Netris VPC but not administer it, you will need to create a separate Tenant and give that Tenant IP resources.
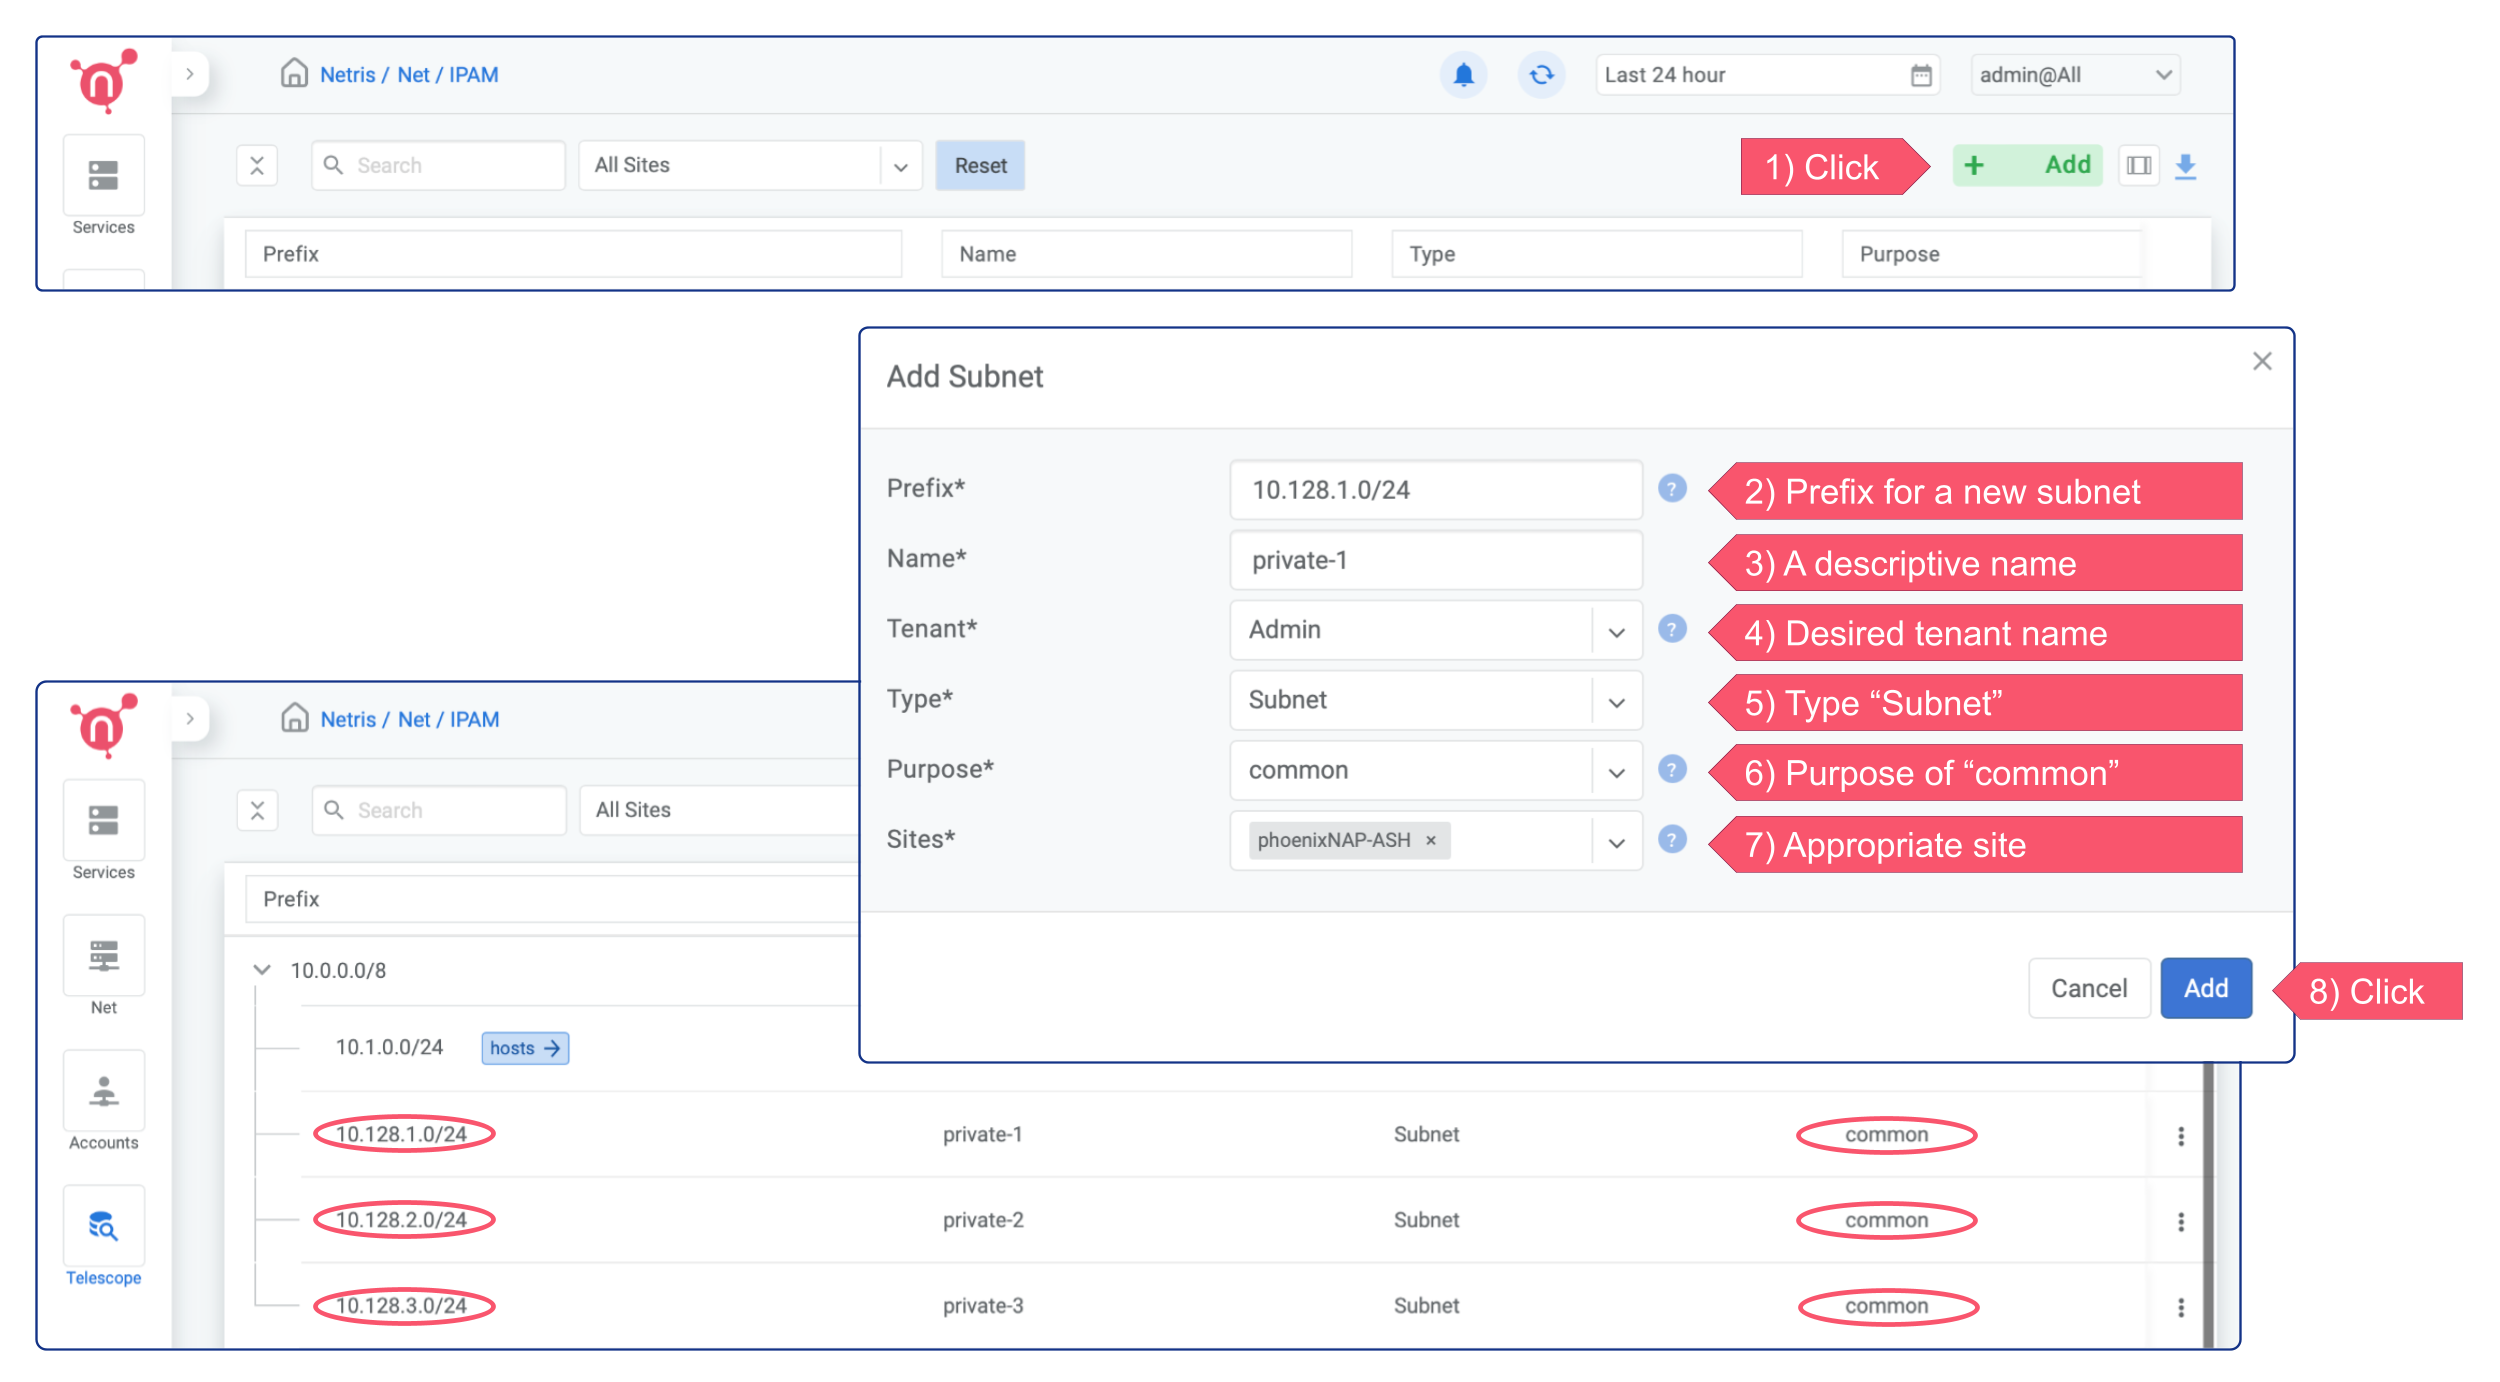
Creating a V-Net
You should create a corresponding V-Net for each virtual network if you use Vmware, KVM, or any other server virtualization platform or VLANs in any way. VLAN ID will be the unique identifier between Netris, phoenixNAP BMC, and your Compute.
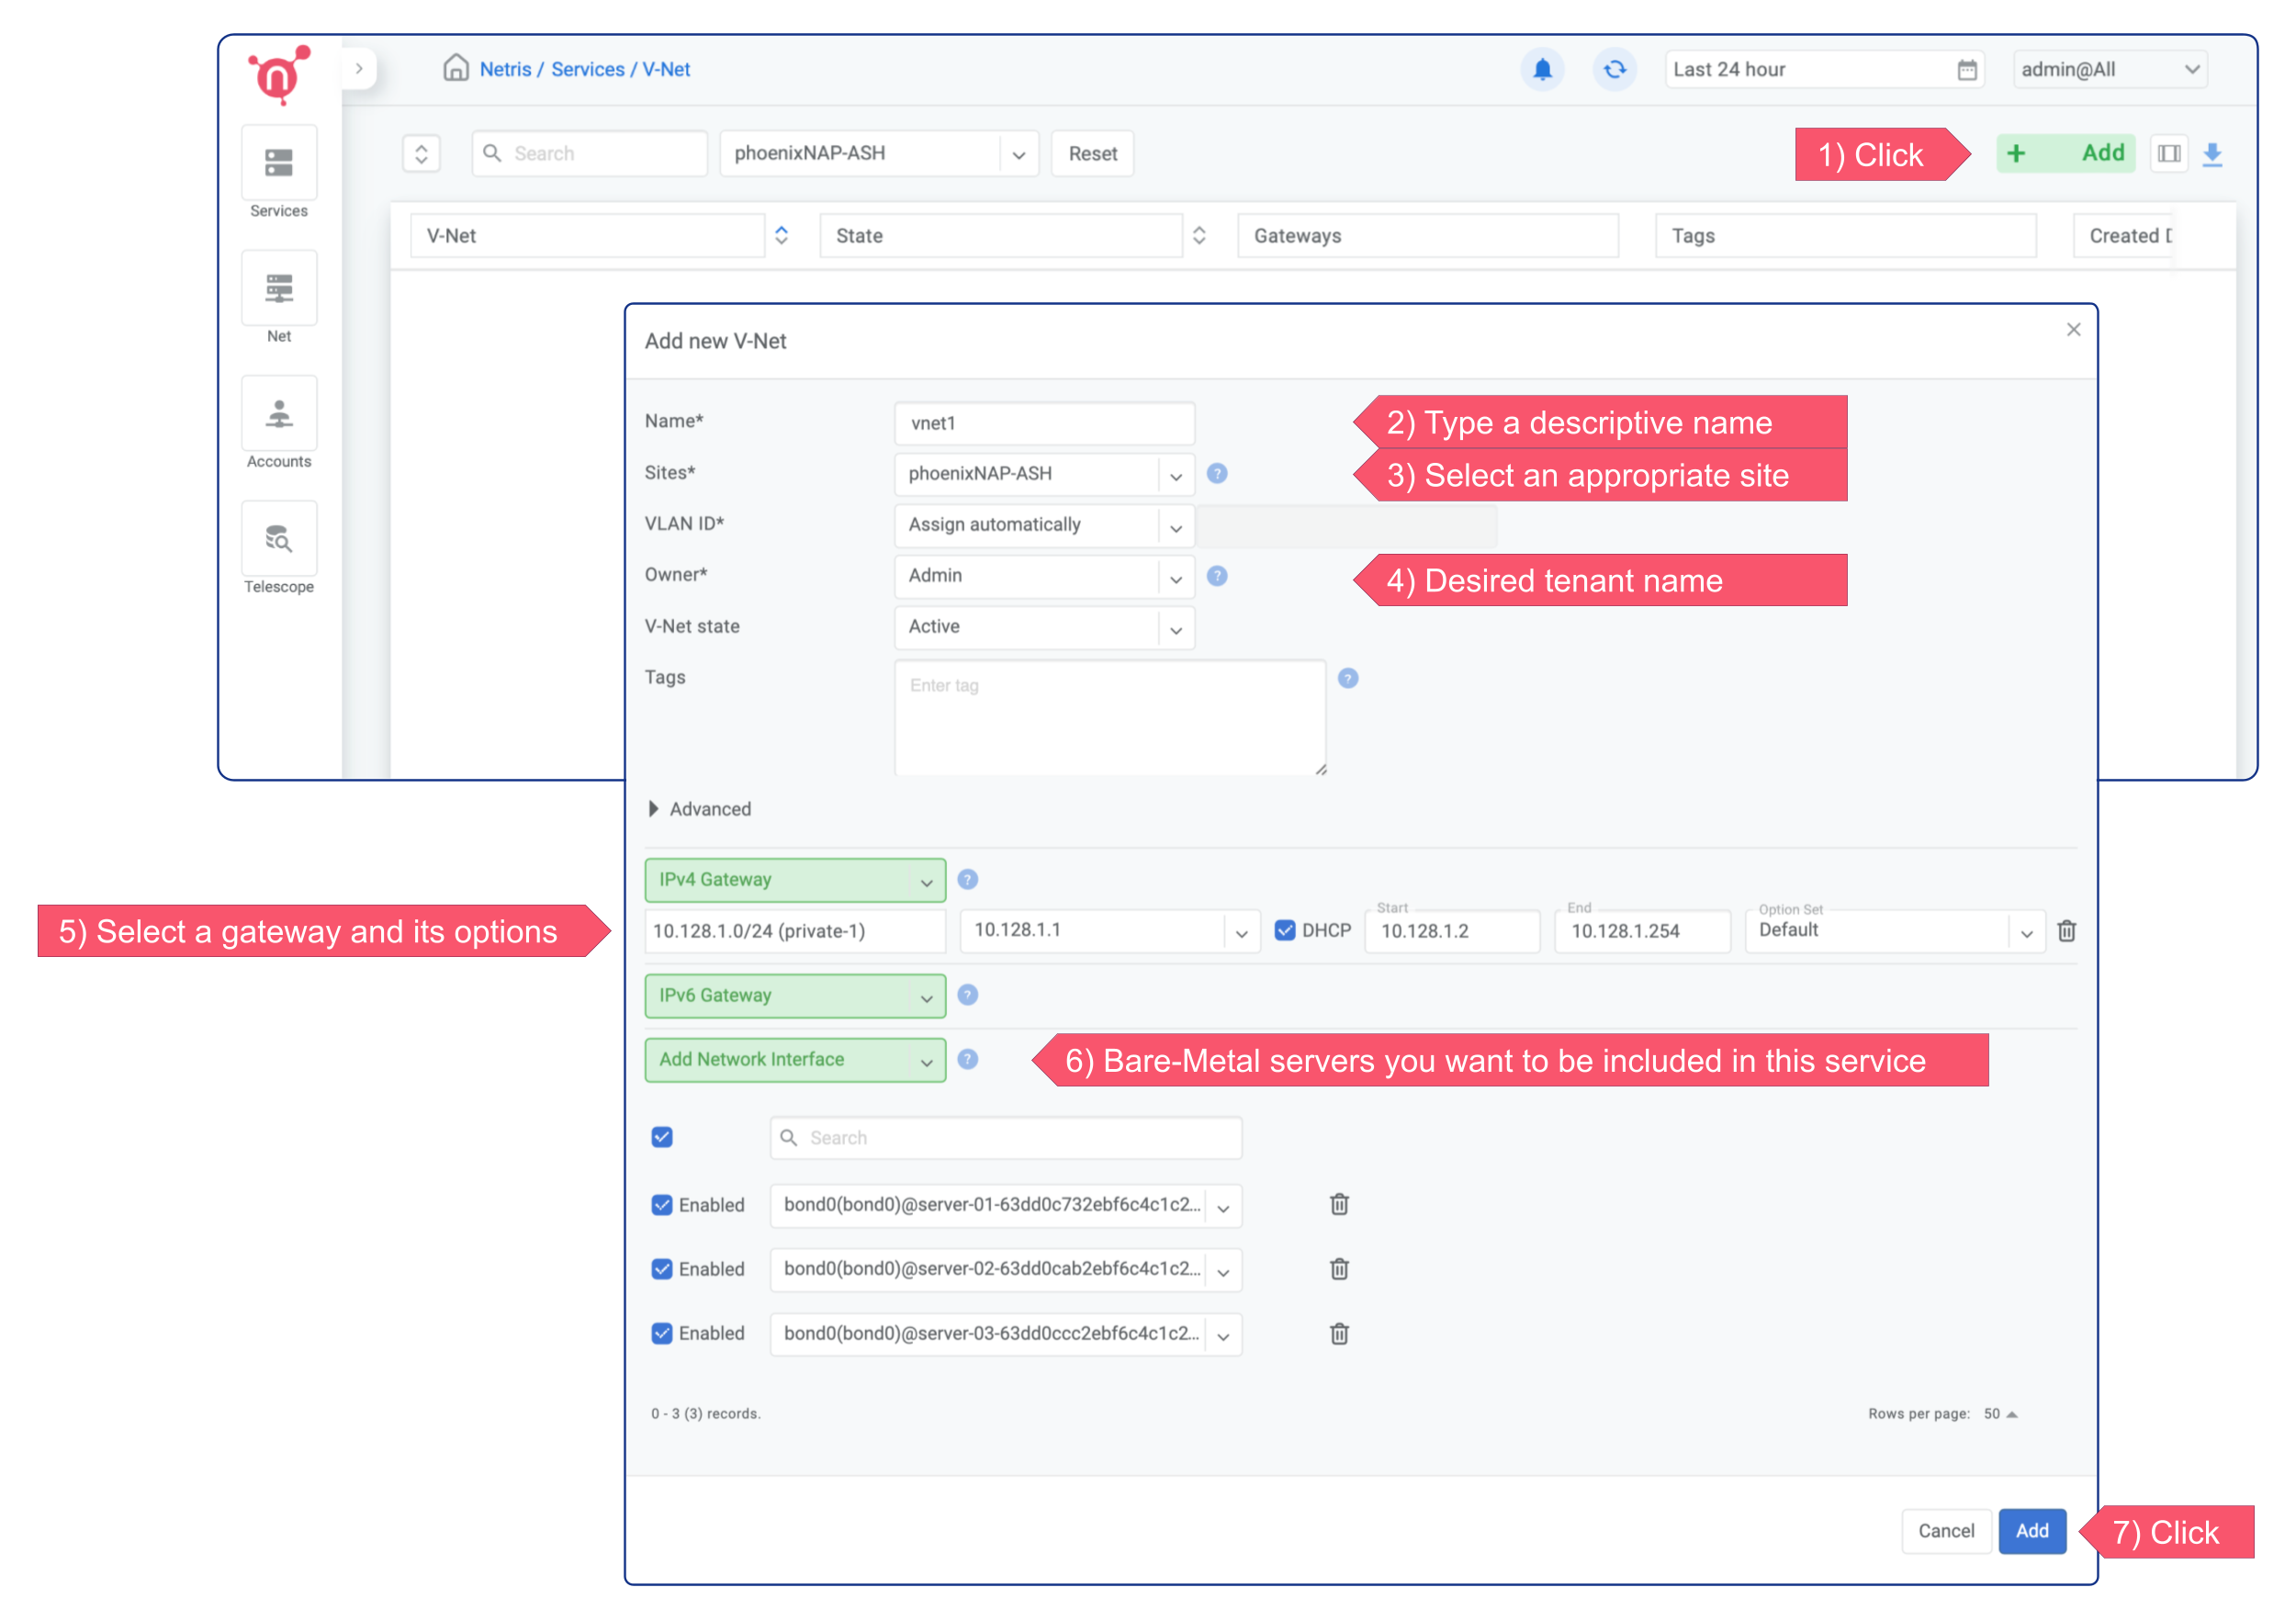
In this example, the new V-NET has VLAN ID 3000, subnet 10.128.1.0/24, and gateway 10.128.1.1. That means three servers (server-01, server-02, server-03) can launch VMs (or subinterfaces) into a virtual network with VLAN ID 3000, and they should use IP addresses from 10.128.1.2-254 pointing to 10.128.1.1 as the default gateway or use DHCP. Netris SoftGate will serve that traffic, and since we have enabled NAT globally in previous chapters, hosts living in VLAN 3000 will have Internet access over the NAT.
Deploy a new server w/ dynamic IP into an existing V-Net
Deploying a new server is significantly simpler when using Netris V-NET compared to the traditional process of setting up a server with a public IP.
The recommended steps:
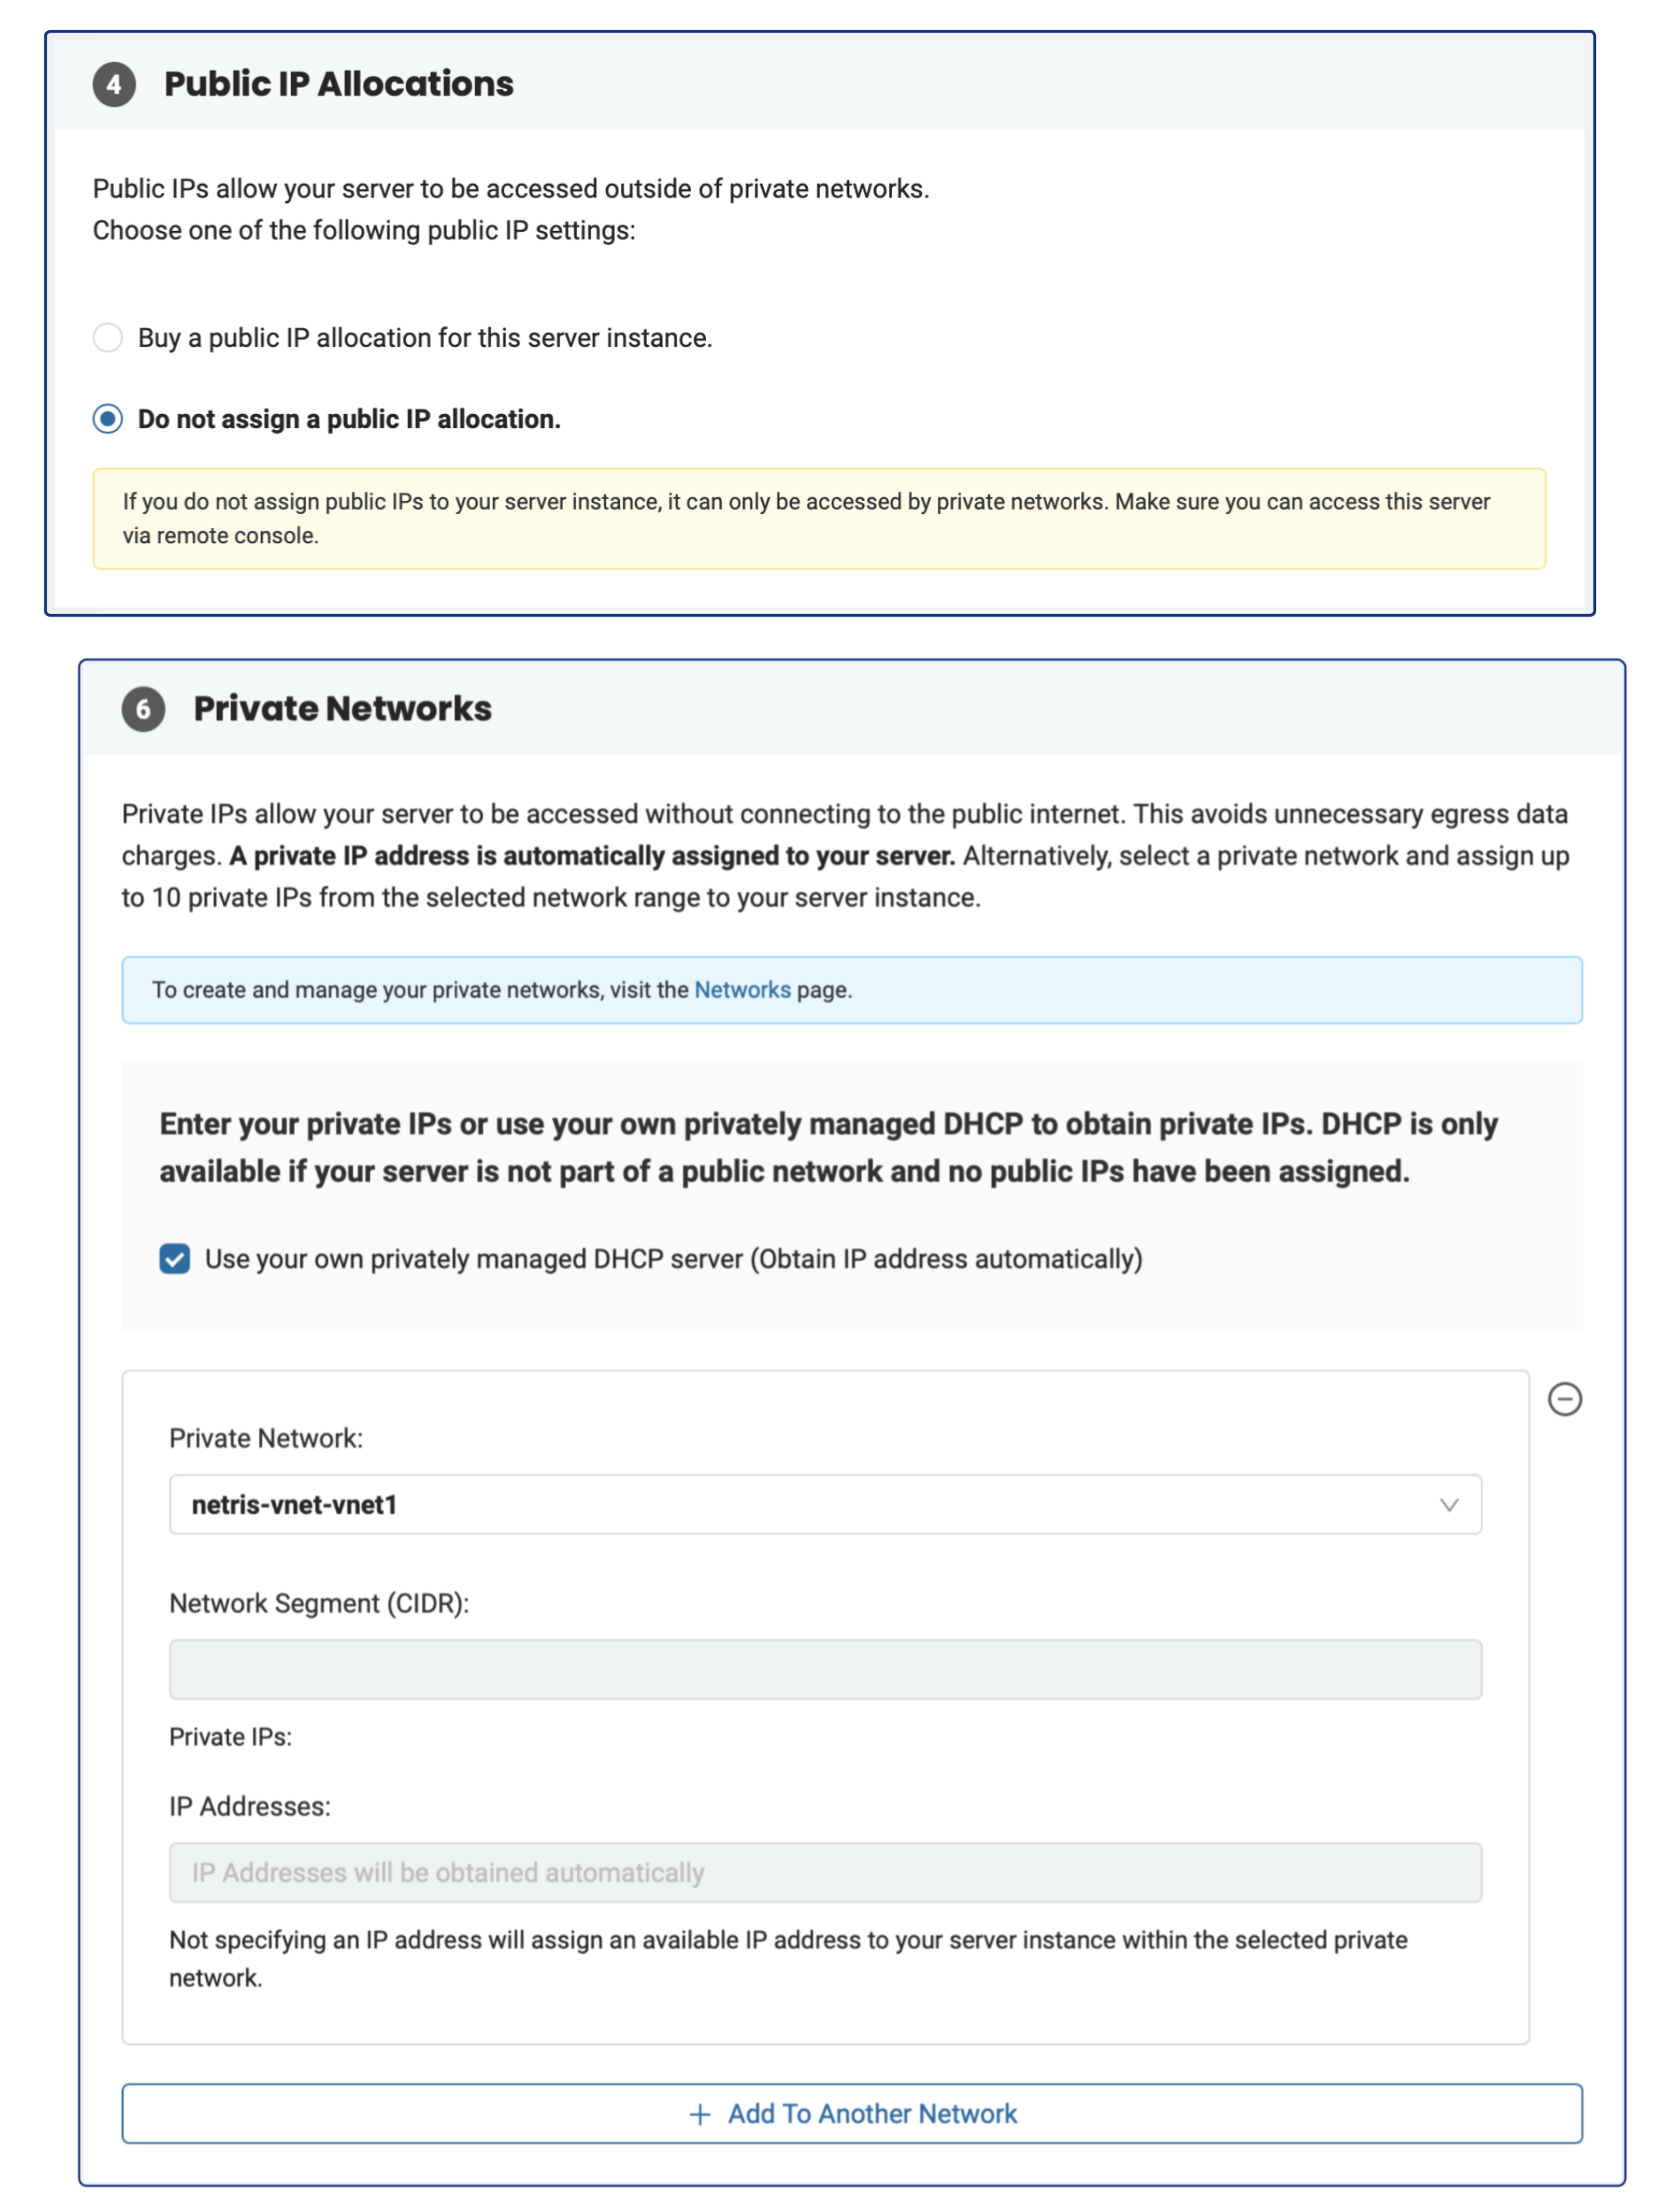
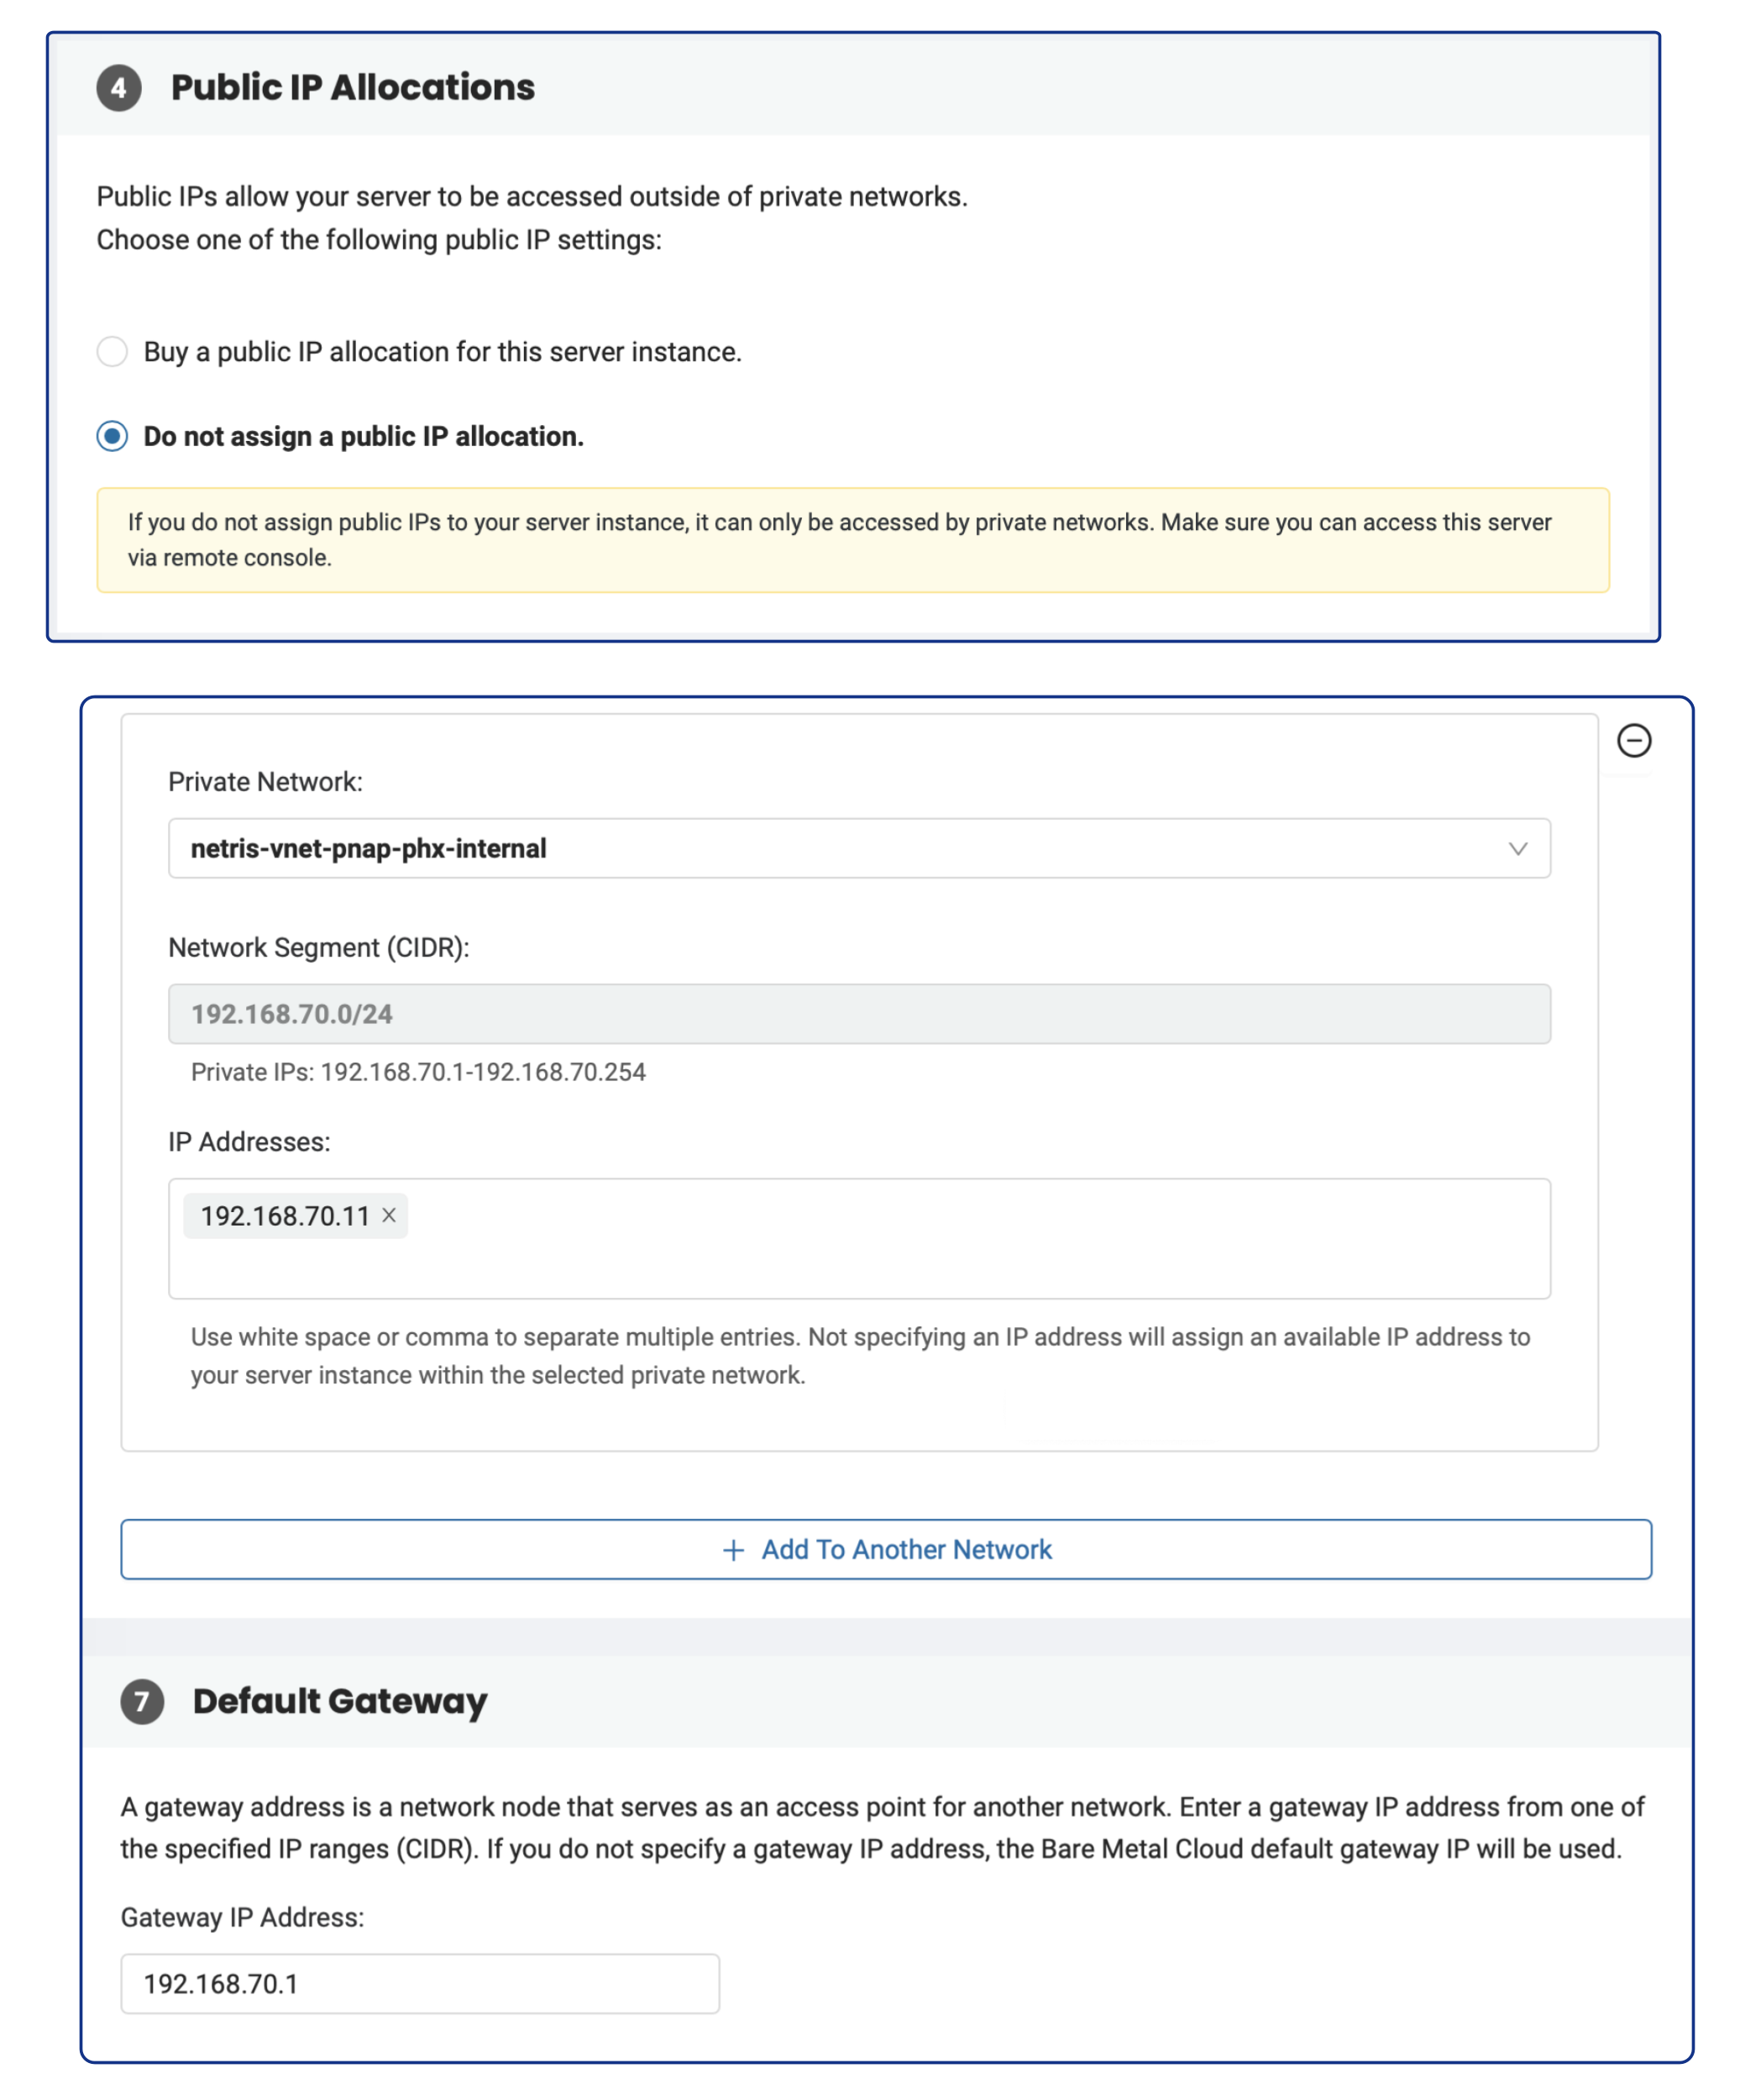
Request a Server: When ordering a server from phoenixNAP BMC, opt for no public IP address.
Select Netris V-Net: In the phoenixNAP web console, select a Netris V-Net (previously created in Netris) as your private network.
DHCP: In the phoenixNAP web console, check the option “Use your own privately managed DHCP server (Obtain IP address automatically)”. Make sure that DHCP is enabled for the given V-Net through the Netris web console.
Netris will automatically include the server into the V-Net and will assign an IP configuration through Netris DHCP service.
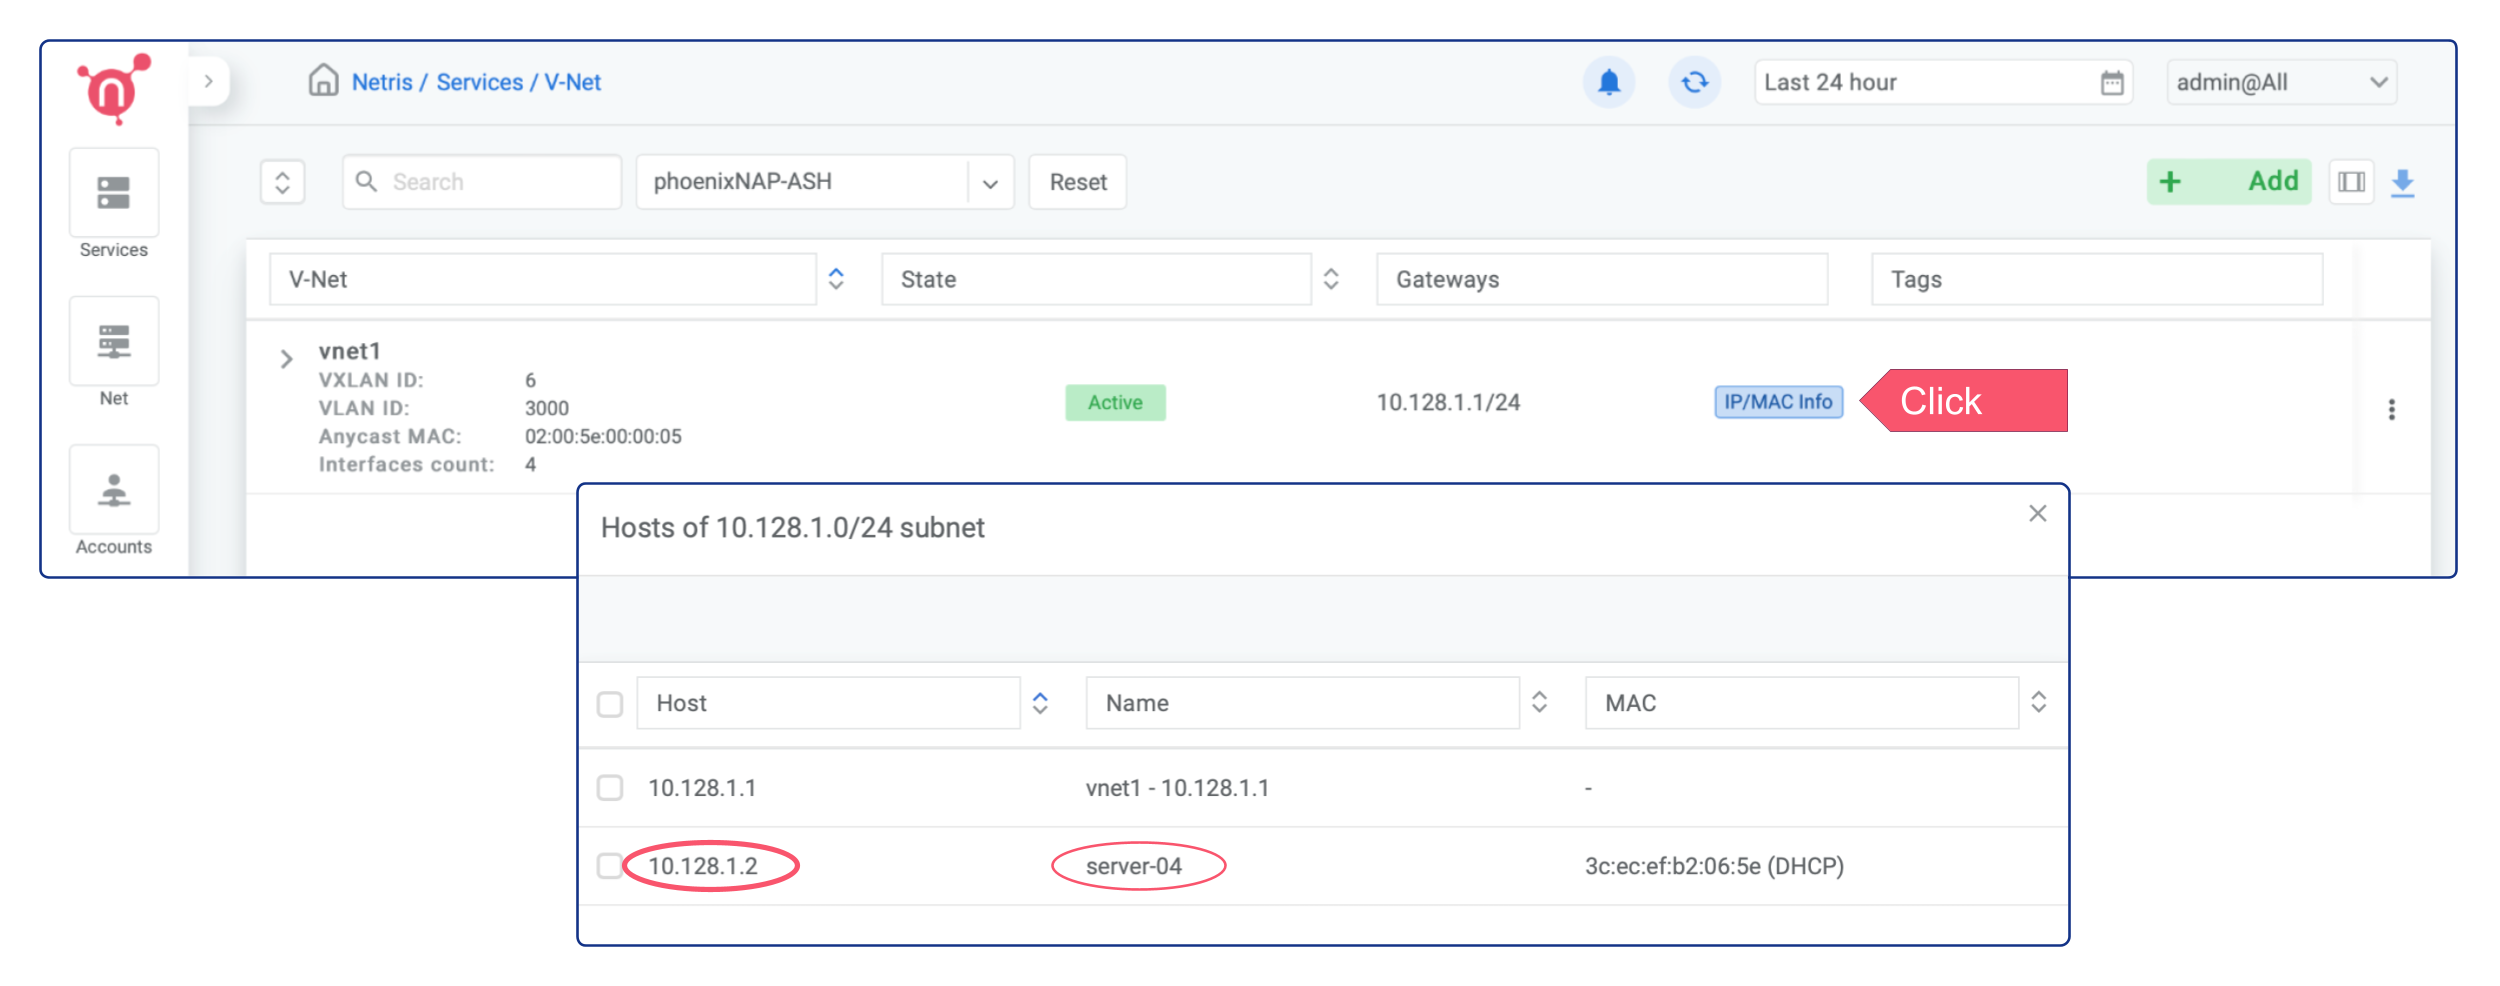
As a result, you will have bare-metal servers in a private subnet that can connect to services outside your VPC (since we have enabled NAT globally in previous chapters), but external services cannot initiate a connection with those servers. Once the servers have been provisioned, they will get a private IP from Netris DHCP, and you can find those IPs by pressing the “IP/MAC Info” button on the V-NET.
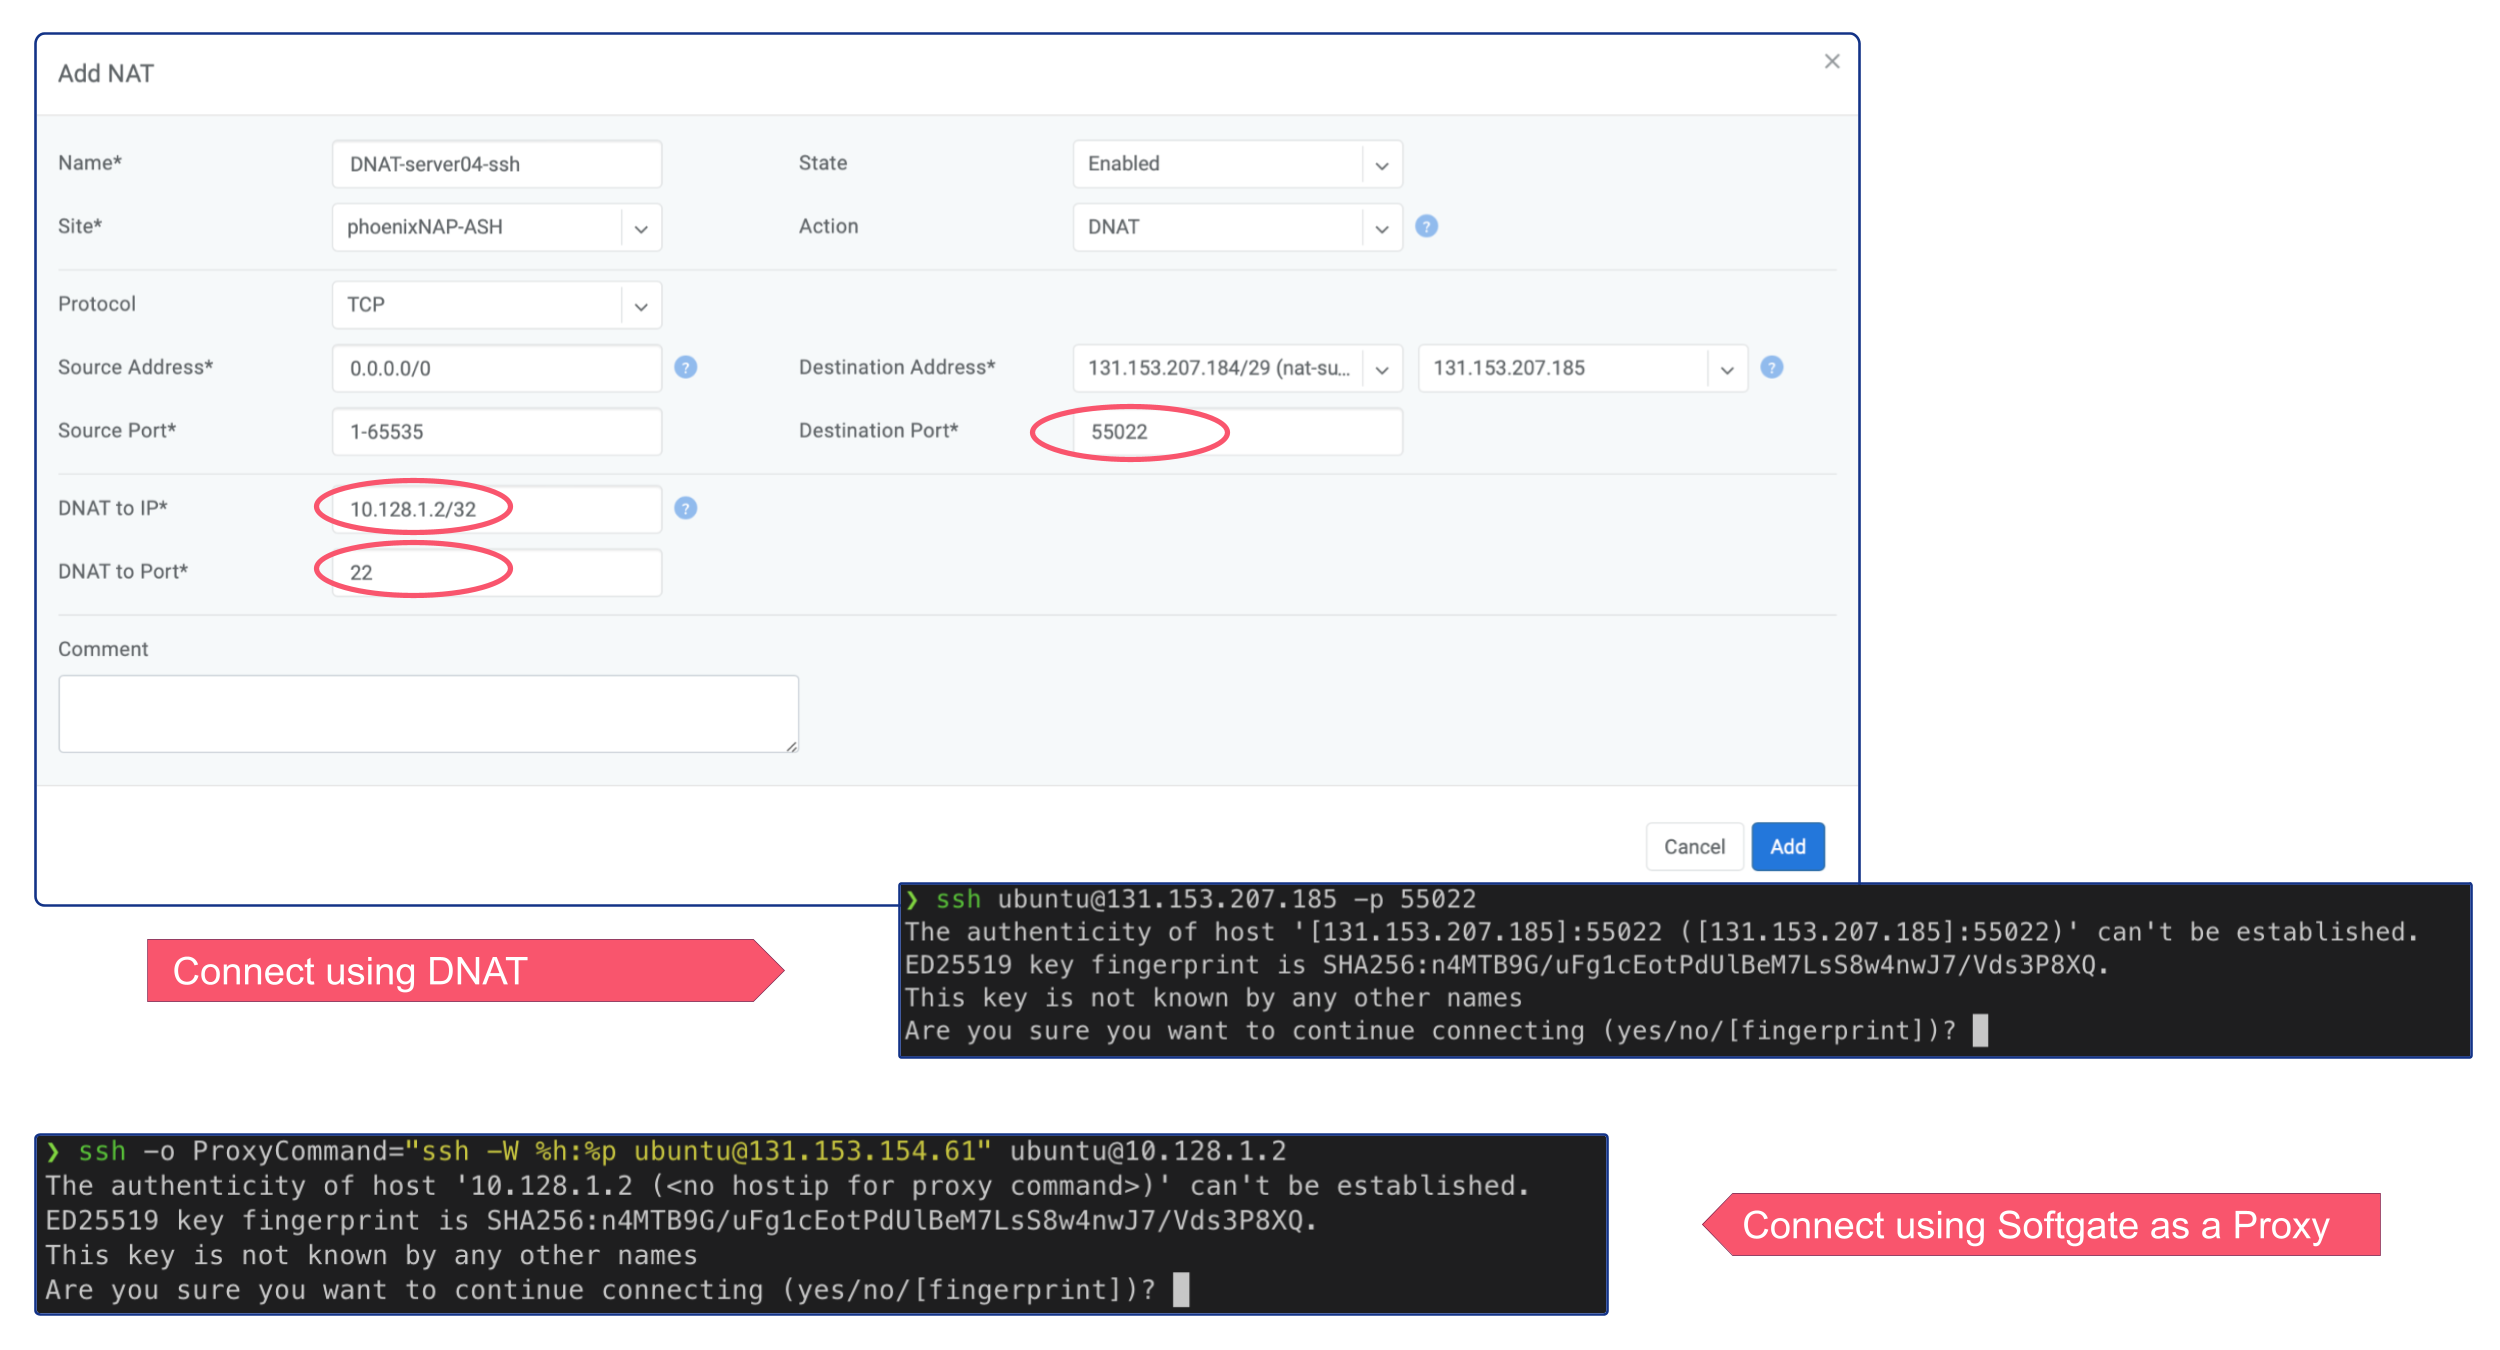
In order to connect via SSH to the newly deployed server, you can either create a DNAT rule and connect via Public IP, or if you don’t need permanent ssh access to that server, you can simply connect using Softgate as a JumpHost.
ssh -o ProxyCommand="ssh -W %h:%p ubuntu@<SoftGate Main IP>" ubuntu@<Server Private IP>
Deploy a new server w/ static IP into an existing V-Net
Deploying a new server is significantly simpler when using Netris V-NET compared to the traditional process of setting up a server with a public IP.
The recommended steps:
Request a Server: When ordering a server from phoenixNAP BMC, opt for no public IP address.
Select Netris V-Net: In the phoenixNAP web console, select a Netris V-Net (previously created in Netris) as your private network.
IP Configuration: In the phoenixNAP web console, enter a valid IP address in the ‘IP Addresses’ text field and specify the Netris V-Net’s gateway IP address in the ‘Default Gateway’ field.
Netris will automatically include the server into the V-Net.
As a result, you will have bare-metal servers in a private subnet that can connect to services outside your VPC (since we have enabled NAT globally in previous chapters), but external services cannot initiate a connection with those servers.
In order to connect via SSH to the newly deployed server, you can either create a DNAT rule and connect via Public IP, or if you don’t need permanent ssh access to that server, you can simply connect using Softgate as a JumpHost.
ssh -o ProxyCommand="ssh -W %h:%p ubuntu@<SoftGate Main IP>" ubuntu@<Server Private IP>
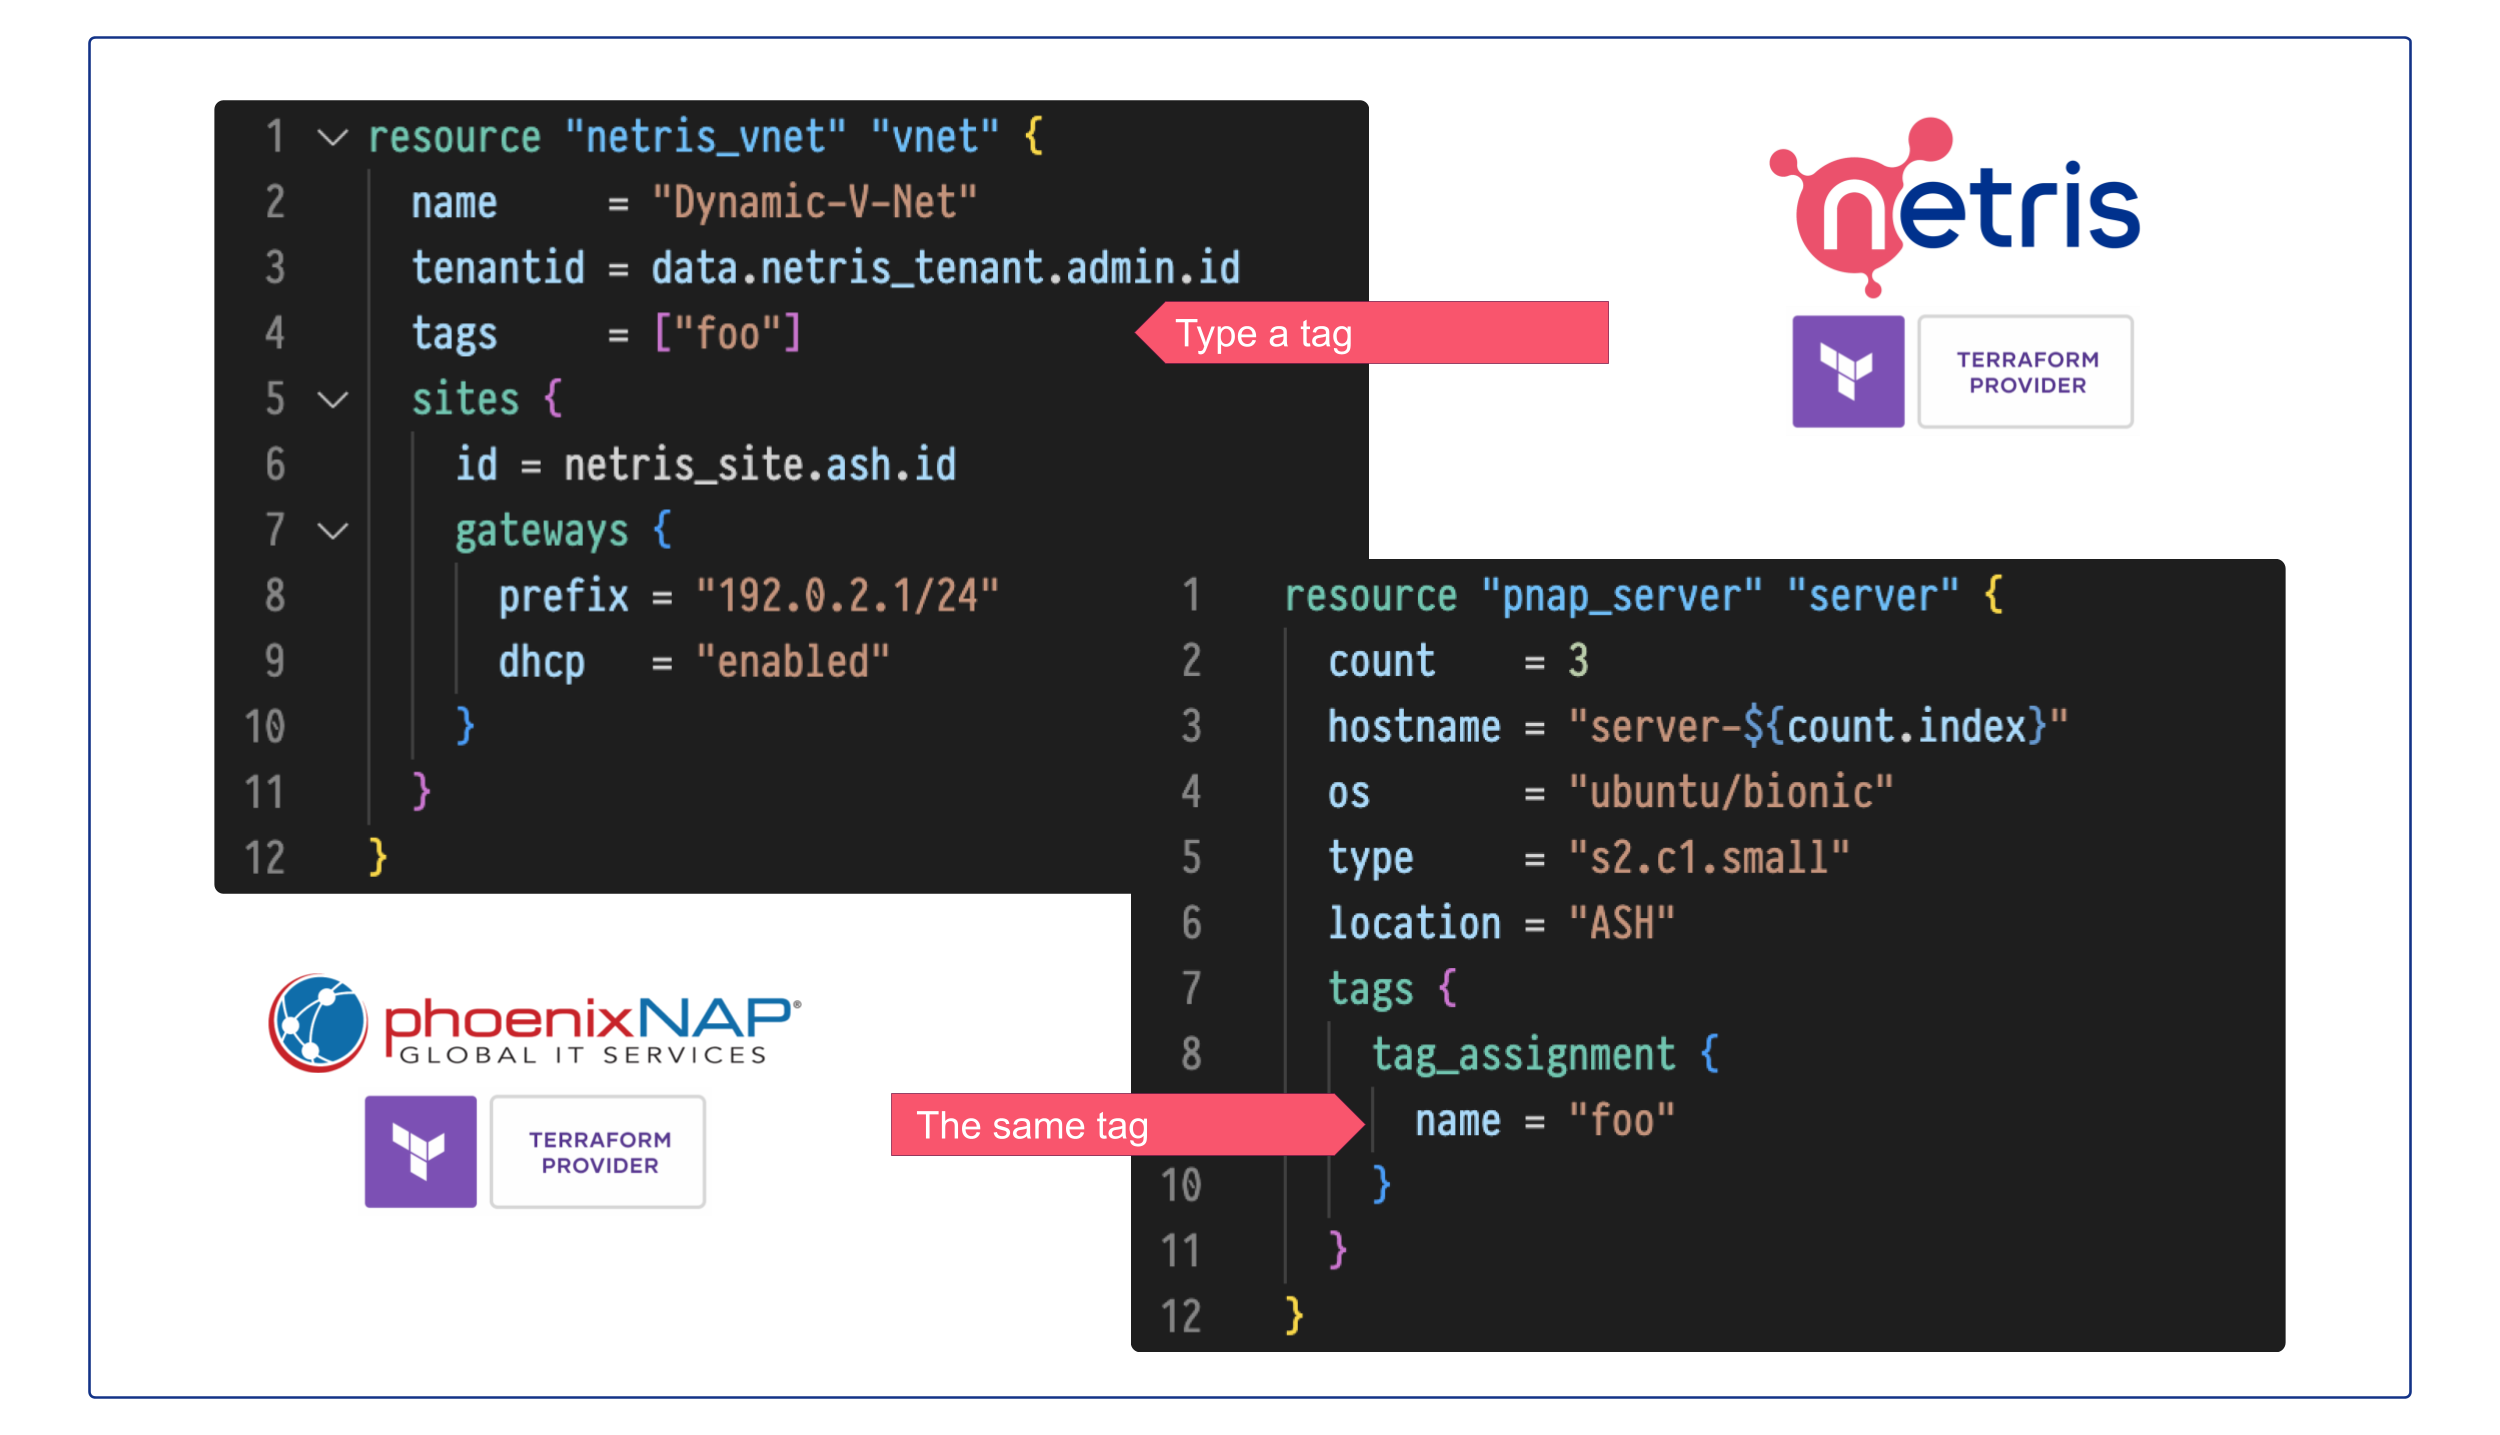
Tags
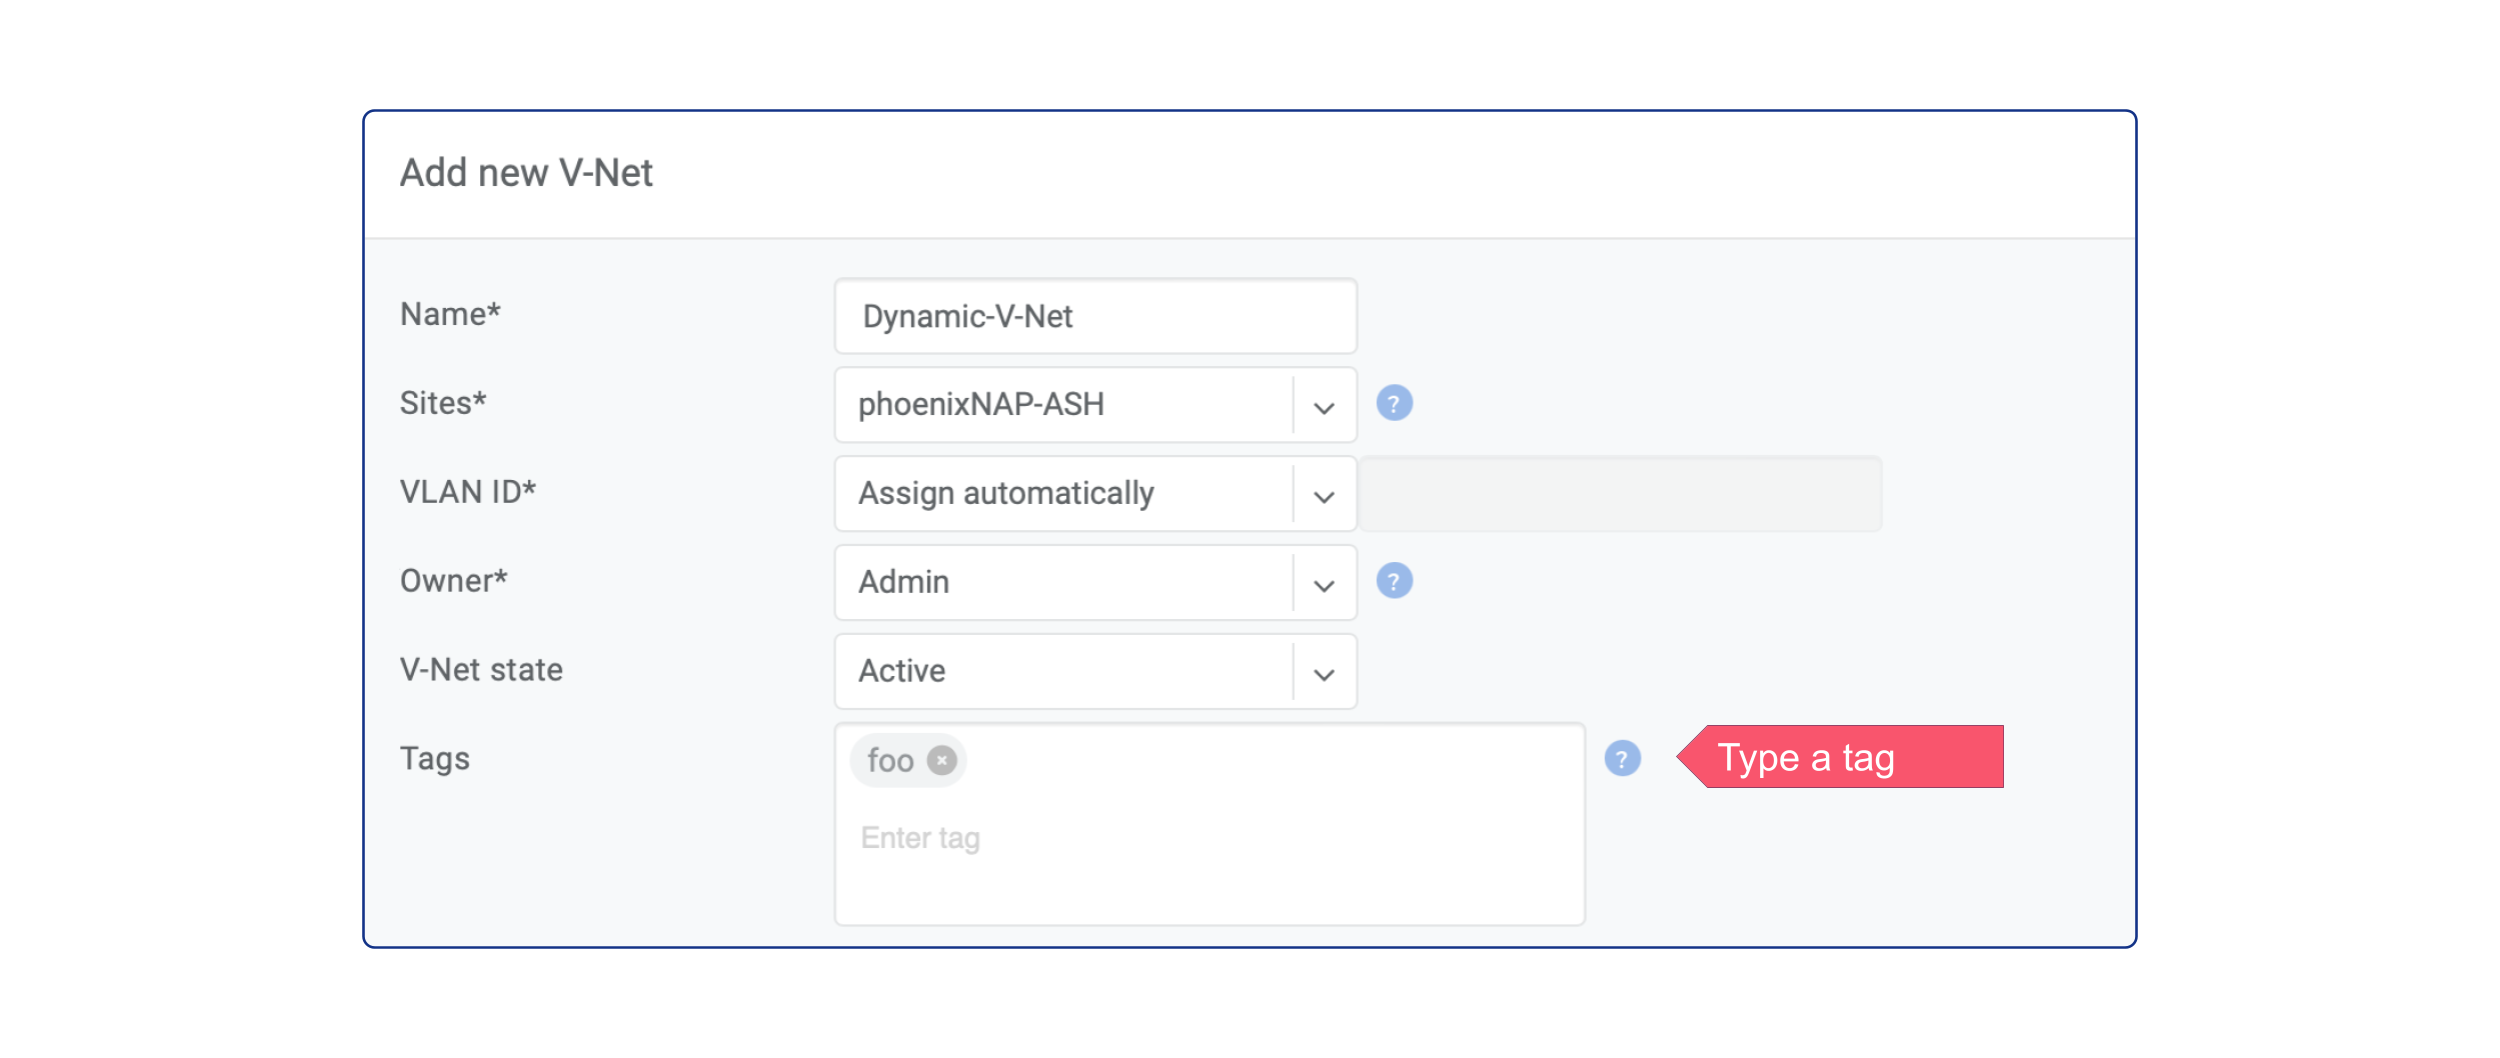
Tags are used to associate bare-metal servers with V-NET dynamically. For that, set any tag to the V-NET and add the same tag to the metal server(s). Then, Netris will include and exclude metal servers from the Private Network based on that tag. Thus, you can make flexible V-NETs, and there is no need to include every new server in the V-NET.
This feature is even more efficient when you build your infrastructure via Terraform. For example, let’s say you’ve created a V-NET with a tag using Netris Terraform Provider, then order several servers with the same tag using phoenixNAP Terraform Provider. And that’s it, when the servers are ready, Netris will detect them and make them part of the V-NET.
Unmanaged
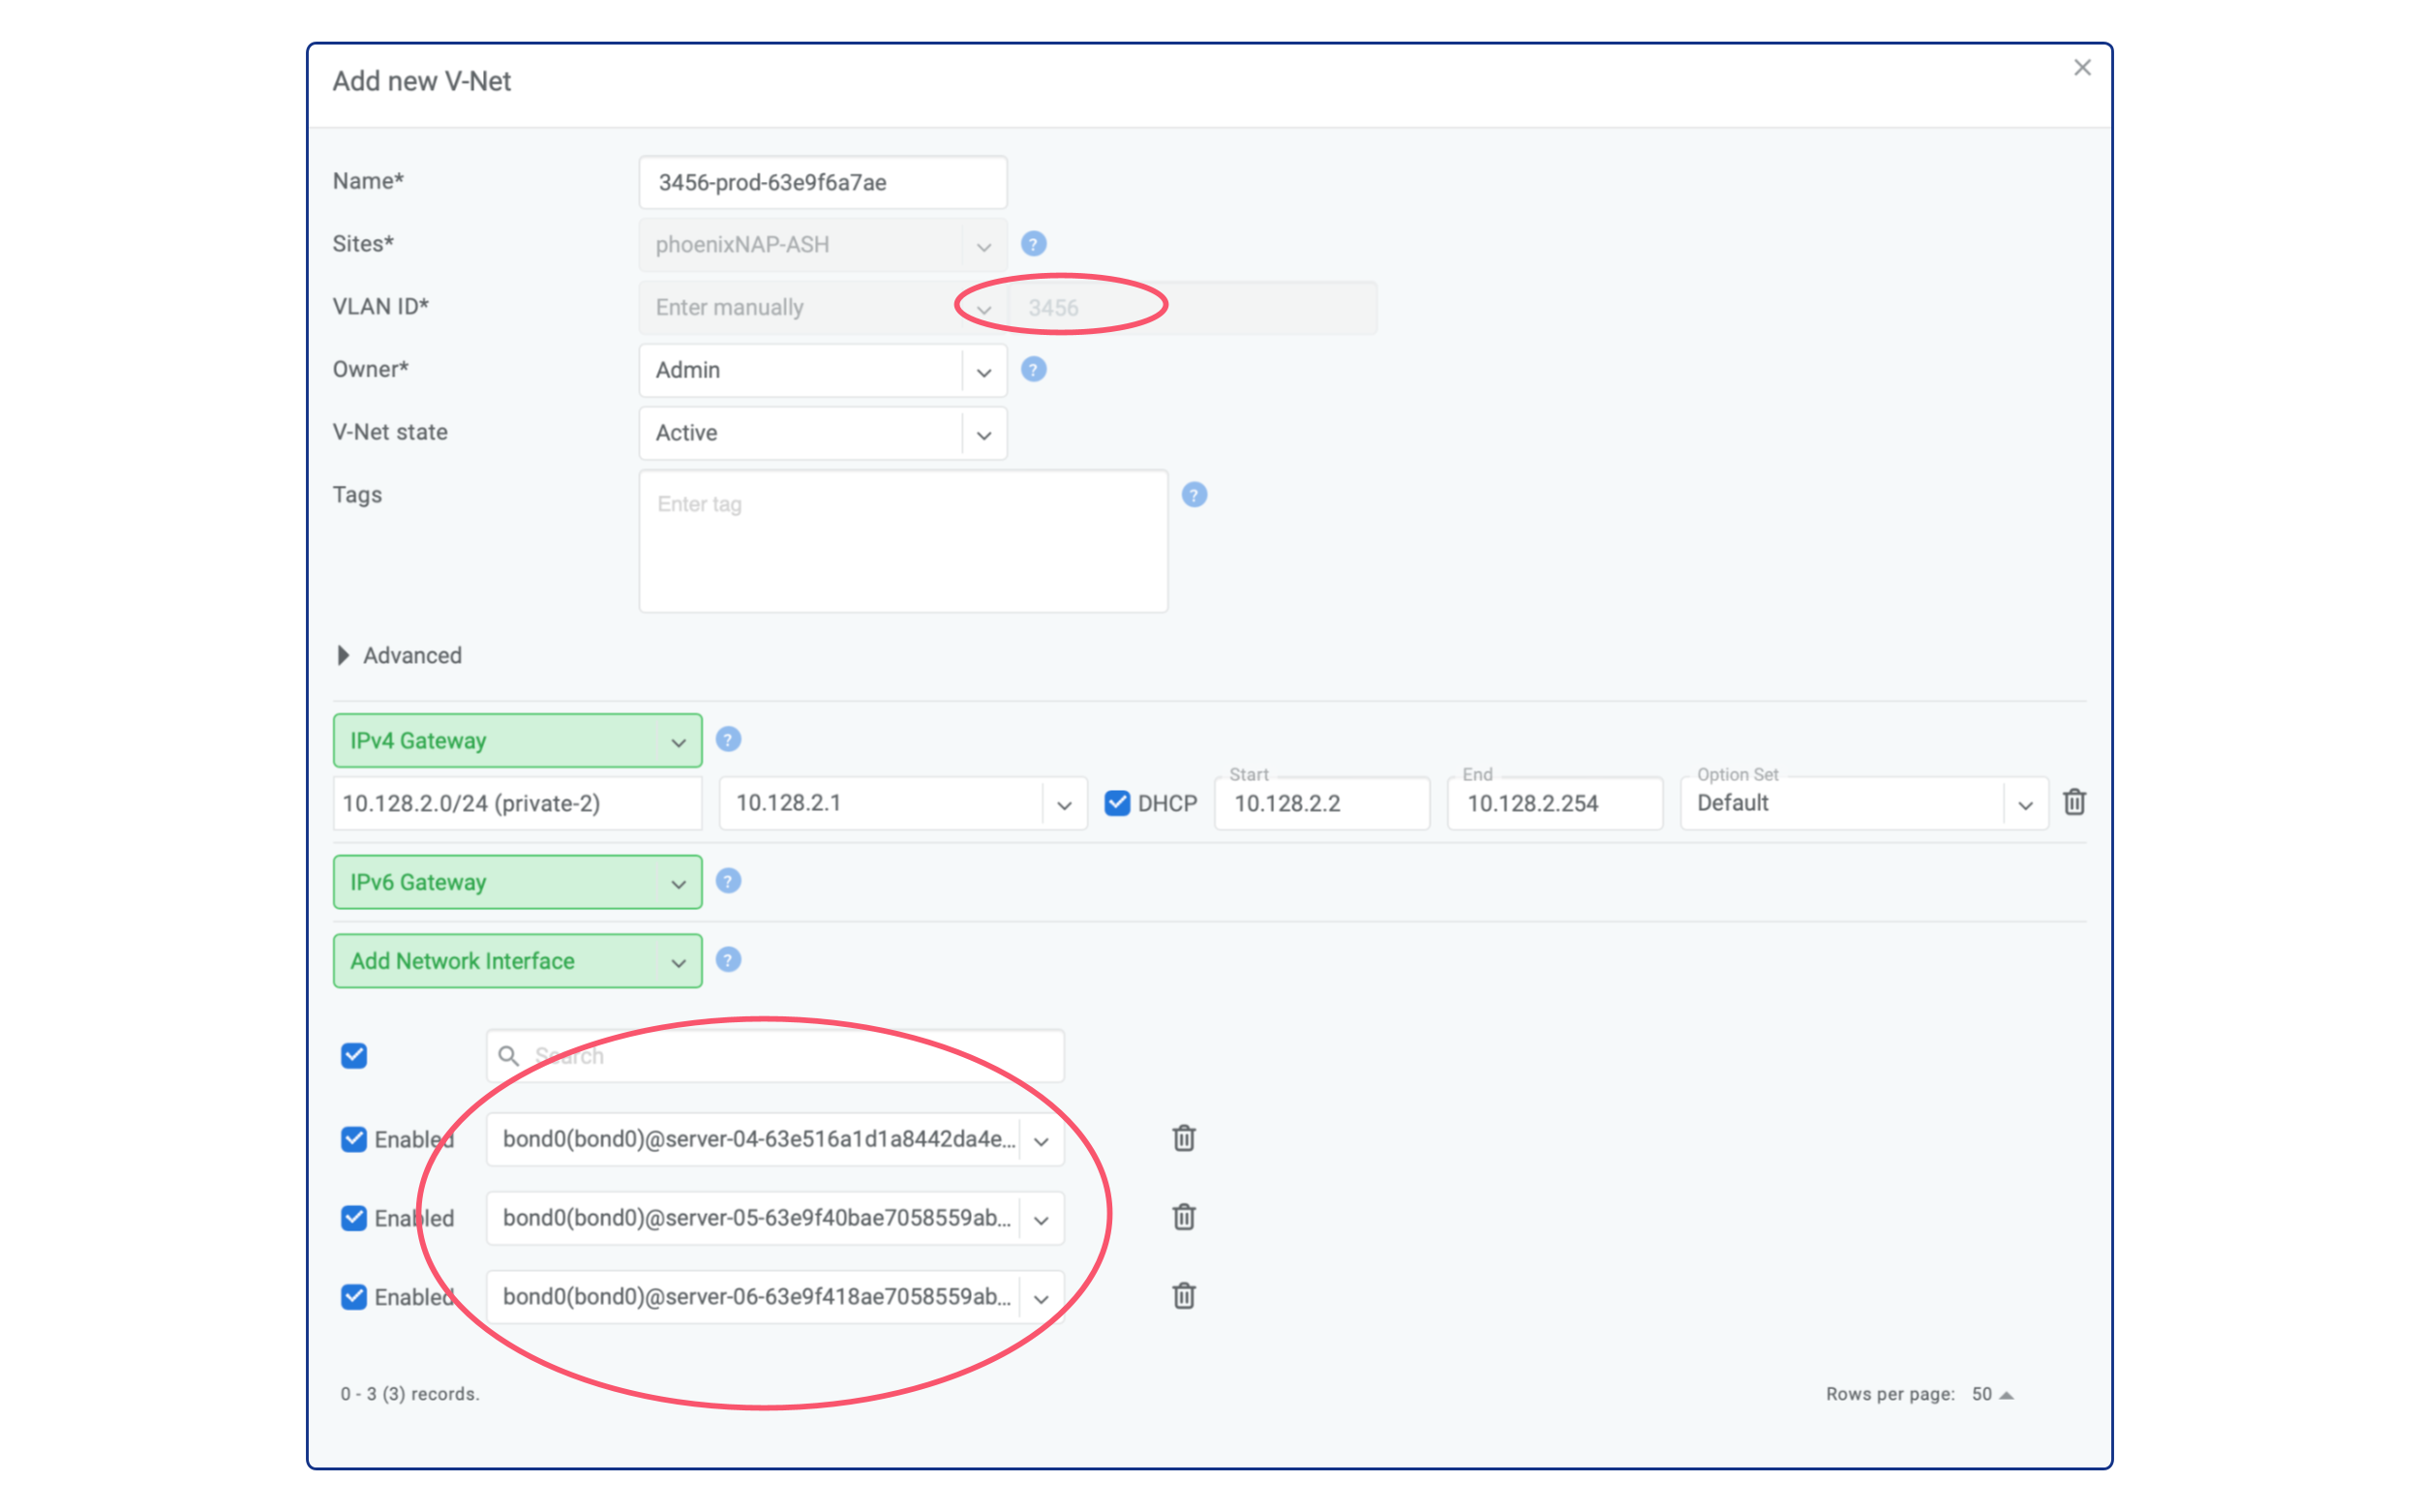
Another option is turning the existing private network into Netris V-Net. All private networks from the allowed VLAN IDs range and in the proper location that Netris has not created are visible as “unmanaged” in the V-Net section.
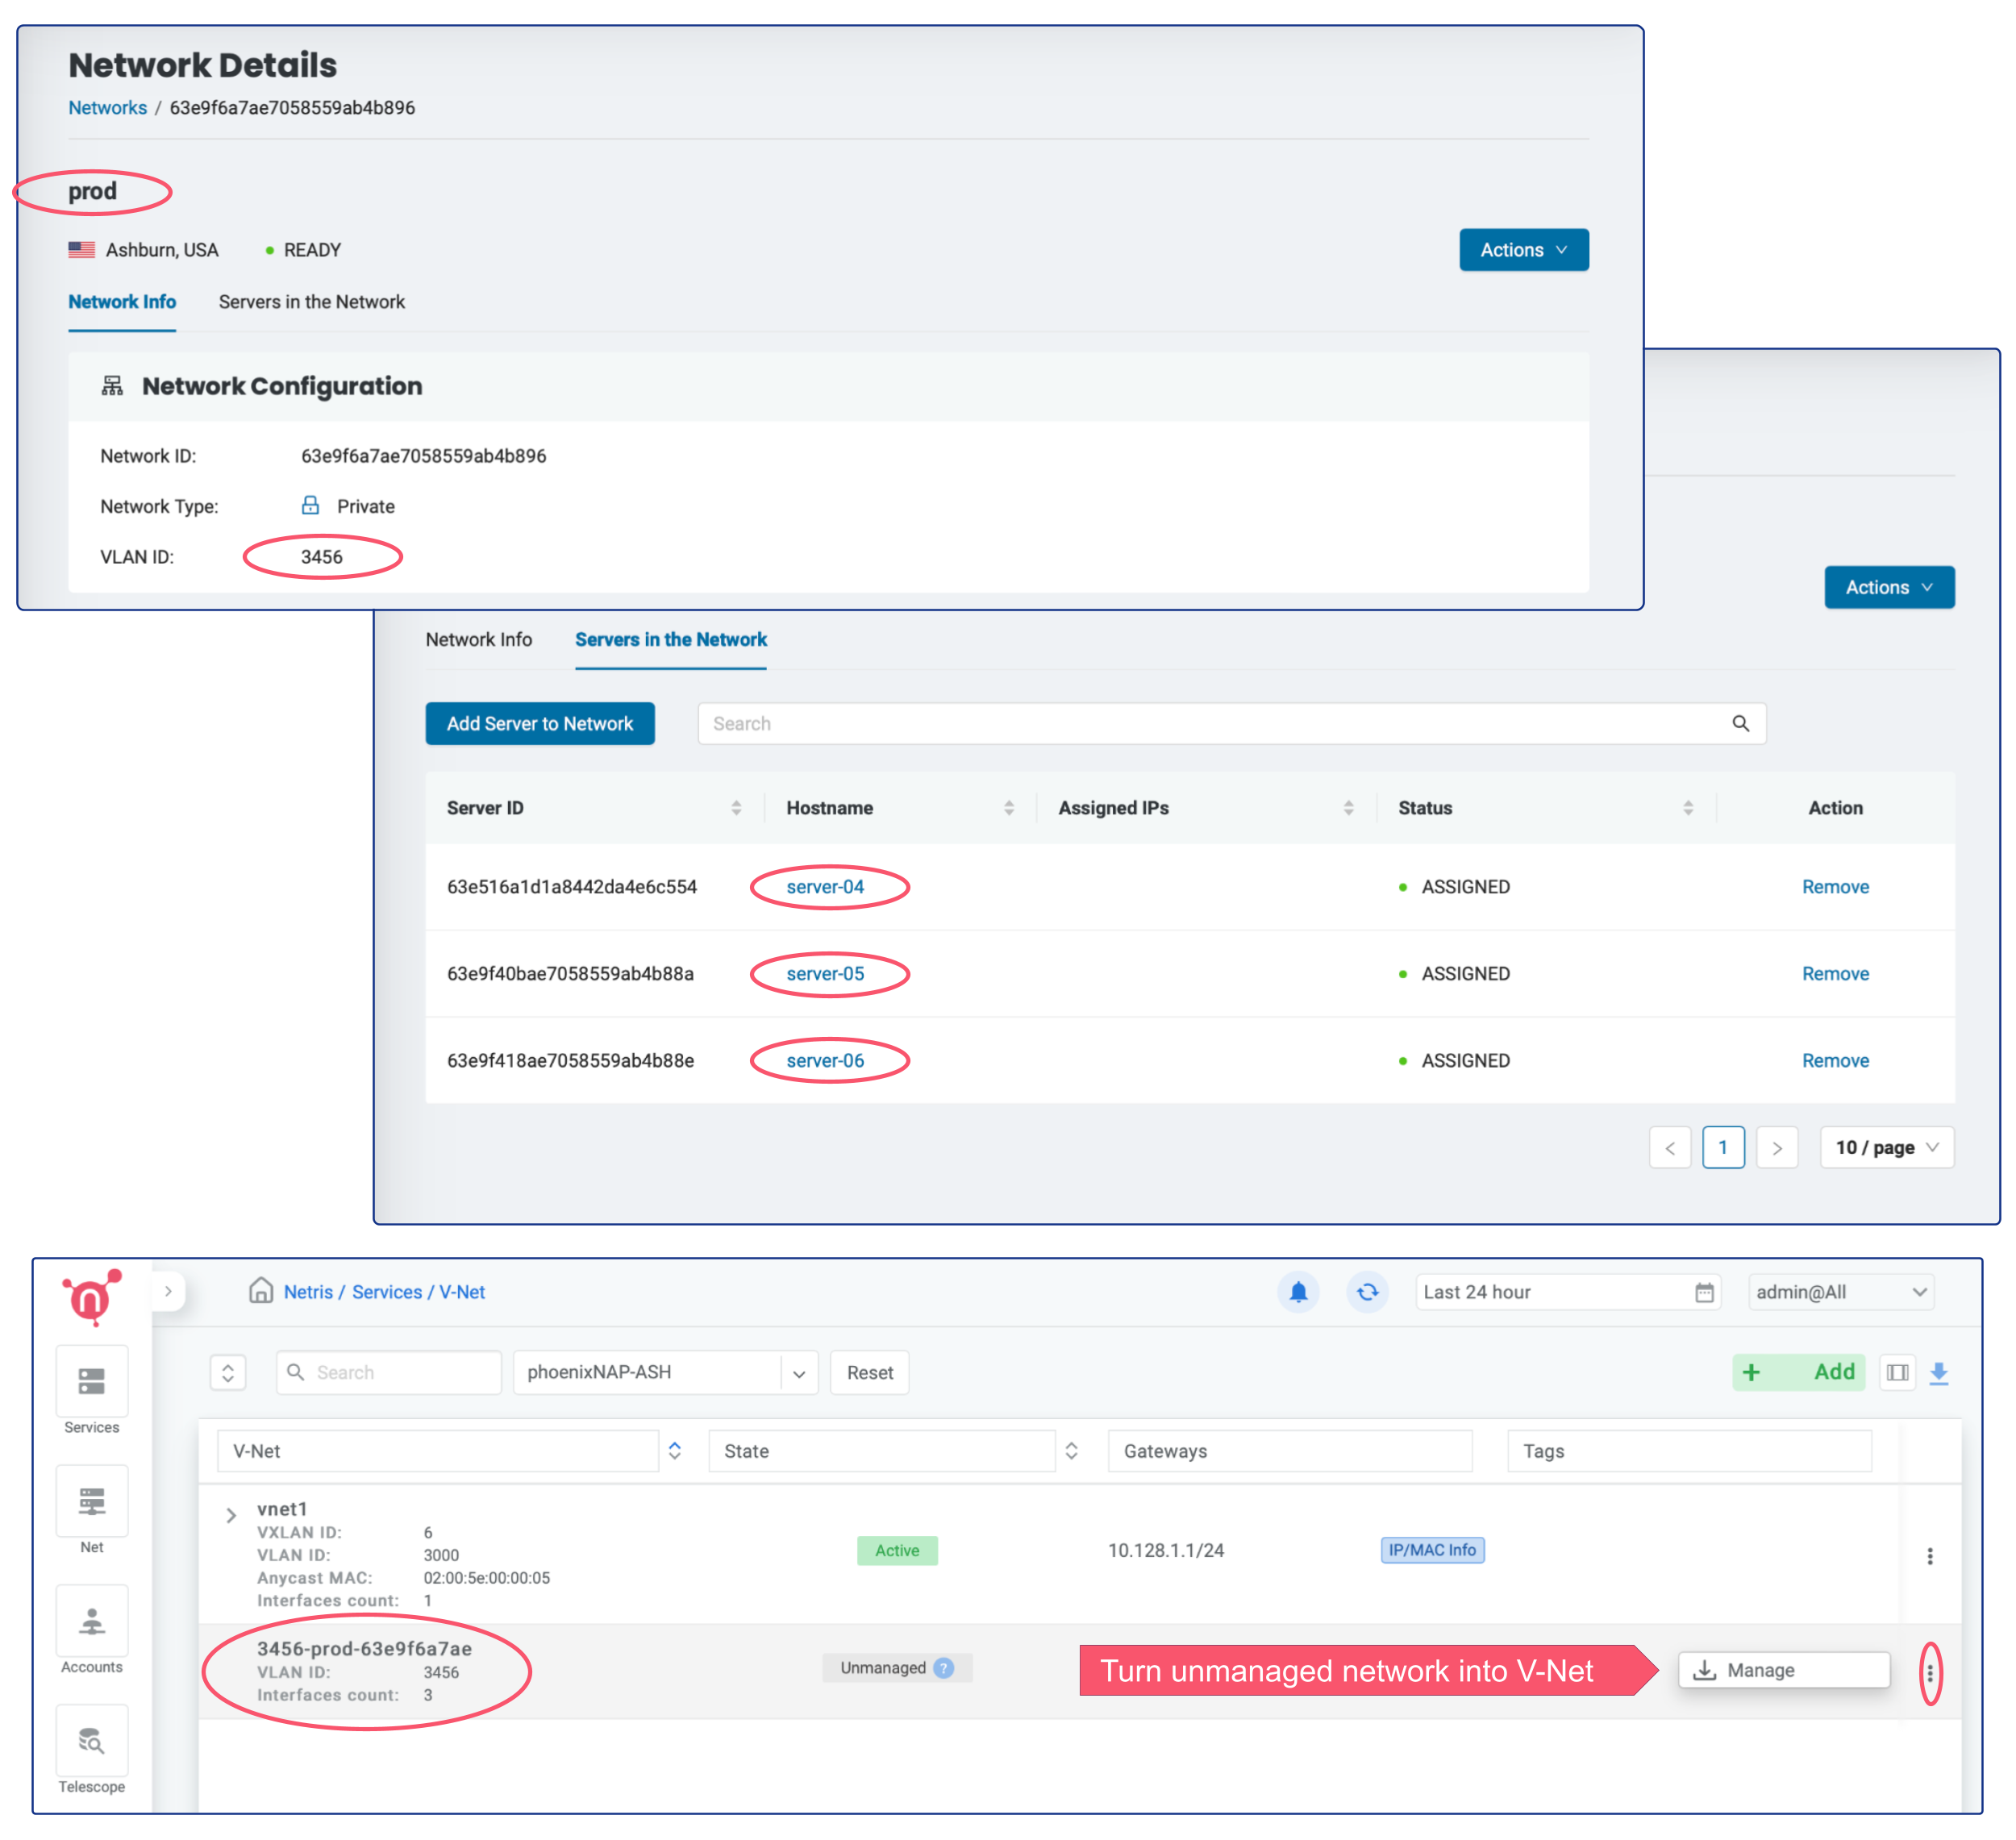
The “manage” button will open a dialogue window where it’s also possible to add a default gateway for the appropriate VLAN.
Warning
Once the private network is being converted into V-Net, it will be managed by Netris and no longer manageable through phoenixNAP BMC console.
Note that you can use Services –> ACLs for granular control over traffic between multiple V-NETs as well as to/from outside (Internet or other remote sites)
Note
Netris creates a private network in phoenixNAP BMC based on declared V-Nets. Besides creation, Netris continuously monitors that private networks. As a result of this continuous monitoring, you can’t edit private networks created by Netris from the phoenixNAP BMC console. However, if any modifications are made, Netris will automatically roll everything back to its state.